The Challenge
 Recently I was challenged with the task of connecting a web application to Twitter and sending out a tweet. This article will focus on the connection to Twitter, saving the talk about sending out a tweet for another article. Having used TweetSharp last year, I thought I would check for an updated version of it and be on my way. When I got to CodePlex, I learned that support for TweetSharp had pretty much stopped in May and the developers had moved onto Hammock.
After reading their explanation, and suggestions for future development, I decided to use Hammock to connect my web application to Twitter. What is Hammock you ask, in their own words, it is a REST library for .NET that greatly simplifies consuming and wrapping RESTful services. In plain English, it makes integrating REST APIs a snap. If you want an explanation of what REST is, please check out Wikipedia.
I have to give credit to ColinM, author of this forum post on CodePlex, for giving me the basis of this code.
Before The Code
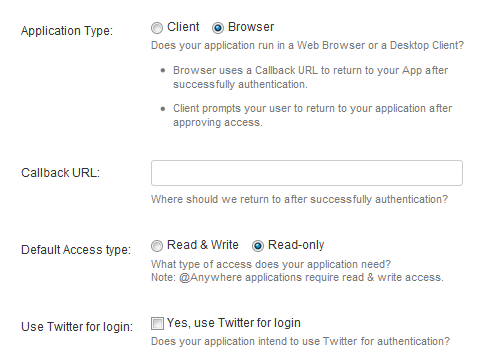
Before you can connect your web application (or desktop application) to Twitter, you need to register with Twitter. This is not the same as creating a new Twitter account, which you will need, instead this is telling Twitter that your application is going to want to interact with it. To do this, go to http://twitter.com/apps/new.

Let’s talk about some of the settings you will need to configure when you register your application.
- Application Type – For this example, choose Browser (Web). If you choose Client (Desktop), you will see the Callback URL option go away.
- Callback URL – This is the URL Twitter will send your users to after they Allow or Deny your request to connect your application to Twitter. I would recommend entering this as your production URL. In this article I will show you how to override this setting in your code.
- Default Access type – If your application is only going to consume data from Twitter, you can leave it at Read-only, but if you intend on posting tweets you will need to select Read & Write
- Use Twitter for login – If you want to allow users to authenticate via Twitter, check this box.
After you register your application, Twitter will give you the information you need to connect. You will need to take note of your Consumer key and Consumer secret. This key/secret combination is unique to your application. The Request token URL, Access token URL and Authorize URL are the same for pretty much everyone. Now that we’ve established your secret identity with Twitter, we can get started.
A Four Step Process
To make my example as simple as can be, I broke it down into four steps. Also, I set up this example using two web forms. Steps One and Two are called from GetTwitterRequest.aspx and Steps Three and Four are called from ProcessTwitterResponse.aspx. You can do this from the same form if you wish. If you’re not into web forms, you can call it from an ASP.NET MVC View as well.
For simplicity, I have setup a couple of private strings called CONSUMER_KEY & CONSUMER_SECRET. Yeah, you guessed it, those are the values we needed from Twitter. You can store these in a database, in your web.config, or hard code them right in your C# code, that’s all up to you.
For the purpose of making a fast, lightweight example, I used Session to store certain information. You will probably want to store the accessKey and accessSecret in a database. You will want to associate these values with your user in your system. We will talk about each key later on.
Here are the related “usings”:
using System.Net;

using Hammock;
using Hammock.Authentication.OAuth;
using Hammock.Web;
Also, many developers have found the need to include the following line of code when talking to Twitter. I can’t explain why.
ServicePointManager.Expect100Continue = false;
Step One: Identify Your Application
var credentials = new OAuthCredentials
{
	Type = OAuthType.RequestToken,
	SignatureMethod = OAuthSignatureMethod.HmacSha1,
	ParameterHandling = OAuthParameterHandling.HttpAuthorizationHeader,
	ConsumerKey = CONSUMER_KEY,
	ConsumerSecret = CONSUMER_SECRET,
	CallbackUrl = "YOUR_CALLBACK_URL_GOES_HERE/ProcessTwitterResponse.aspx",
};

var client = new RestClient
{
	Authority = "http://twitter.com/oauth",
	Credentials = credentials
};

var request = new RestRequest
{
	Path = "/request_token"
};

RestResponse response = client.Request(request);
Before you can connect your application with Twitter, you need your application to identify itself. Above you will find a pretty standard piece of code that you can use to do that. You won’t have to change much of this code to get it working with your application.
First, you need to instantiate your credentials. To do this, you’ll need to provide your CONSUMER_KEY, CONSUMER_SECRET, and Callback URL. Use your key/secret combination provided by Twitter. Your Callback URL is the URL of the page you want to process the response from Twitter. As a note, Twitter only supports hmac-sha1 signatures. After you’ve created your credentials, you’ll need to instantiate a RestClient and RestRequest.
In short, the RestClient uses your Credentials to execute your RestRequest. When you execute your RestRequest you will need to capture the RestResponse for use in Step Two.
Step Two: Ask For Permission To Connect
var collection = HttpUtility.ParseQueryString(response.Content);
Session["requestSecret"] = collection[1];
Response.Redirect("http://twitter.com/oauth/authorize?oauth_token=" + collection[0]);
In step two, we are going to parse the RestResponse from our RestRequest in Step One. If Twitter recognizes your application, you will receive a temporary key/secret combination that we’ll call requestKey and requestSecret. This key/secret combination will be used to request authorization to connect your application to your user’s Twitter account. It is important to note that this combination is good for one request. Once you use them, you’ll have to get a new requestKey and requestSecret to make new authorization requests.
I used HttpUtility.ParseQueryString to break apart the querystring in the RestResponse. The first part is going to be your requestKey, and the second part is your requestSecret. To actually make the request, you are going to send your requestKey back to Twitter. You will want to store your requestSecret for use in Step Three. For this example I stored the requestSecret in Session. You can store this in a database if you want, but due to it’s temporary nature, storing it in Session or a Cookie should work just as well.
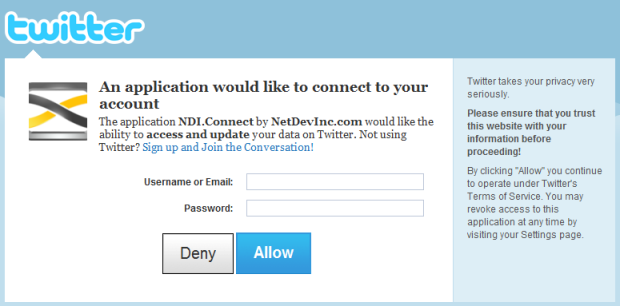
When you redirect your user to Twitter for authorization to connect your app to their Twitter account, they should see a screen similar to the one below.

Step Three: Wait For Twitter’s Response
var requestToken = (String)Request.QueryString["oauth_token"];
var requestSecret = (String)Session["requestSecret"];
var requestVerifier = (String)Request.QueryString["oauth_verifier"];

var credentials2 = new OAuthCredentials
{
	Type = OAuthType.AccessToken,
	SignatureMethod = OAuthSignatureMethod.HmacSha1,
	ParameterHandling = OAuthParameterHandling.HttpAuthorizationHeader,
	ConsumerKey = CONSUMER_KEY,
	ConsumerSecret = CONSUMER_SECRET,
	Token = requestToken,
	TokenSecret = requestSecret,
	Verifier = requestVerifier
};

var client2 = new RestClient()
{
	Authority = "http://twitter.com/oauth",
	Credentials = credentials2
};

var request2 = new RestRequest
{
	Path = "/access_token"
};

RestResponse response2 = client2.Request(request2);
At this point, your application will be waiting for Twiiter to send back a response. It will do so by redirecting the user to the URL you sent Twitter in Step Two. This step is very similar to Step One, with the exception that we will be sending more data. Besides your CONSUMER_KEY and CONSUMER_SECRET, you will need to provide your requestToken and requestVerifier, which you get from Twitter’s call to your Callback URL. You will also need your requestSecret which you stored in Step Two.
Again you will use a RestClient to execute your RestRequest. When you execute your RestRequest you will need to capture the RestResponse for use in Step Four.
Step Four: Remember Your Secret Handshake
Now all we need to do is parse the response from Twitter and save the token and secret they return.
var accessResponseCollection = HttpUtility.ParseQueryString(response2.Content);

Session["accessToken"] = accessResponseCollection["oauth_token"];
Session["accessSecret"] = accessResponseCollection["oauth_token_secret"];
Twitter will respond, if the user allowed the connection, with a permanent accessToken and accessSecret. This IS your secret handshake with Twitter. You will want to store the accessToken and accessSecret in your database. I know I stored it in Session, but that’s because I was too lazy to wire this example to a database. Using you accessToken and accessSecret in future Twitter API calls is how you connect to your user’s Twitter account to your application. This token and token secret do not expire unless the user removes the connection to your application via the Twitter web site.
In closing, all this article really does is help you connect with Twitter, you will have to find something to do with this connection. It should also give you a light understanding of REST API calls as well as some insight on the OAuth authentication process. There will be future articles to help you tweet from your application or get data from Twitter to display.
To find out more about the technologies in this article, check out the following links.
Hammock – http://hammock.codeplex.com/
OAuth – http://oauth.net/
Twitter API – http://apiwiki.twitter.com/


 Yeah, you read that right. ByATool.com is looking to add one or two writers with various IT backgrounds. This is not a job, it is simply an avenue for you to get your work read. We want to know what YOU want to write about. It’s no fun to be given a topic to write about when your passion lies elsewhere. Please contact us at the address listed below so we can discuss this one-on-one!