Unit Testing 4.0 Web Forms Including Event Handlers Like Page_Load Using Dynamic

If you’re too lazy or just plain impatient, you can find the source code here.

So one of the biggest pains in a place that doesn’t lend itself well to be in pain has been trying to unit test web forms like how MVC controllers can be. Before 4.0, this was an aggrevation at the least. Something in between stubbing one’s toe and getting only chocolate icecrfeam when you ask for a @*&*ing swirl. Serious, how hard is it to pull the swirl lever? Really.

Anyways, so there are certain things in .net web forms that were pretty difficult to hande/mock/get around for testing. Let’s take session for instance. Session is a sealed class with a non public constructor. To make things more interesting, the Page class only has a get for the Session property. Now you could go through a lot of hell, mostly reflection, to get aroud this, but who wants to do that? Personally I gave web forms the ole one finger salute, but being that I am working with web forms again… yeah had to find a way to get around this. The answer? Stems from dynamic.

Basically what I had to do is create a class that has a Session property that is dynamic, and then replace the old Session call with a class that calls a property named Session. The effect to the code, as far as the immediate code behind is concerned, is just this simple adding of the class before the Session call. Far as the code to do this, it’s fairly easy too.

First I started with an interface since using an interface will help later if I need to mock.


This is the bread and butter. Basically we have a container that will hold the session object. Making the property dynamic allows it to be set to anything. All I have to worry about is that whatever I set it to has the functionality used by Session. This is started by implementing the interface fo use on the site:


And then one for use with testing:


How are these used? Well if we take a base page:


So what this does is holds two constructors; One for use by .Net when it runs the site and one for the test class when it is testing the page functionality. The second is a way to stop all the stuff that happens in the Page class constructor when it’s time to unit test this [explitive]. This might look familiar to people who have used things such as Dependency Injection with MVC to help with Controller testing. If not, the idea is simple. It basically just gives the Page the test handler we need it to use when testing. If we aren’t testing, then we let it just use the default handler.

You might wonder why I didn’t instantiate the live version in the constructor, and the answer is: Session isn’t ready to be used at constructor time when doing the normal web site thing. Therefore, it will be set the first time the SessionHandler property is called. If it’s a test, well then it’s fine to set it in the constructor since it is bypassing the normal web site… thing.

The unit test looks something like this:


As you can see, a test version of the handler is created and the Session object is replaced with a Dictionary since that’s what Session is… well it has more to it but the most used feature is the key/value match and it happens to be the only part of Session I show in this example.

Since there is the second, test only, constructor on the page, we don’t have to worry about any asp.net stuff getting in the way when instantiating the page. The page will look like this:


As it can be see, the replacement of the Session call with SessionHandler.Session allows the features of Session but also the testability it lacked for so long. It’s true that if you want to use other features of Session, if there are any and I can’t remember, you’ll have to just add them to the test version so they can be called at test time. I can’t do everything for you.

Test Driven Development… A Simplified Start

So I went to a “doctor’s appointment” yesterday and was asked to do some pair(ed?) programming to solve a simple-ish request. Basically it was:

Get a number in a list of integers that is closest to 0.

Sounds easy enough, right? Well there are a few more rules but nothing game breaking:

  • If the list contains a 0 then return 0
  • If the list is null then throw ArgumentNullException
  • If list is empty then throw ArgumentException
  • If there is no 0 then get the number nearest 0
  • If the closest is the same for positive and negative (Say -2 and 2), return the positive

Again, fairly simple thing to work on.

Right off the bat I set about creating the method for doing this since my usual plan is:

  1. Create method
  2. Unit test
  3. ???
  4. #$@%!

The fourth step is actually repeated a couple times.

So after I had done the more brute force sort of way, and had a failing test, it was suggested I start over. This time stick with the TDD like mindset of

  1. Create test
  2. Fail test
  3. Add code to make it work
  4. Watch it succeed

Now the concept of TDD I have known about for a while, but never really had a chance to really jump into it. After all, most companies just want something done now, not done well. Beyond that, I had reservations of how it works and whether I was smart enough to pull it off. After all, I had always thought you have to be able to see the whole method before it’s written in order to create tests. Well after yesterday I can say I was wrong… at least about the second part.

When I started writing test methods I was told to make them each this way:

Always add to a method the most simple way to get a test to run.

Yeah ok, it sounded better when I heard it yesterday. However, I have examples.

So if we take the first requirement:

If listToCheck contains a 0 then return 0

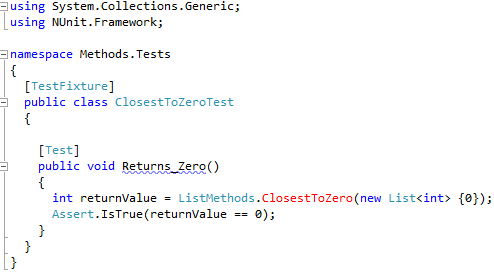
Well what should I write as a test? Easy:


As you can see I am only checking to make sure there is a 0 returned. Side Note: You might notice that the method is red. This is because it hasn’t been created yet. That’s the next step. What should I put in the method? Remember I only want to put in the most simple way to get the test to pass.


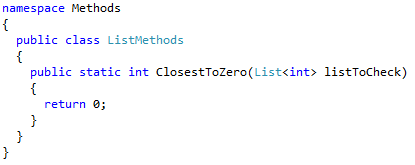
Which gives me this guy:


Right now you’re probably thinking that test is the programing equivalent of Master of the Obvious. I mean, of course it passes because it always returns 0. The next unit test might help with seeing the bigger picture:


Ok so now I’m testing:

If the list is null then throw ArgumentNullException

So naturally I have a test that expects an ArgumentNullException to be thrown. I don’t have that yet in the method though so the expected result when running the test is:


Boom. Go figure. Next step is to add only what is necessary to make the unit test pass.


Now you can see that I have added an exception to be thrown if the list is null. Time to run the tests:


Now I know that the method does take care of the first two requirements. From here I go requirement by requirement and create unit tests to make sure the requirements are met and have them all fail at first. After the test fails, add in the minimal amount of code necessary to get the test to pass.

Eventually you will have a working method that is completely covered.

You might be wondering why this site still exists but you might also be wondering why you should go requirement after requirement adding just what’s needed. The answer is actually simple: It lets you know exactly what changes you make breaks any other test. You see, if you were to do the normal “build the method and test” and there’s a test failing, it becomes harder to track down the issue since the method is now a bunch of code. Since there are multiple points of failure when you start writing the tests, tracking down a specific error is hard.

If you go requirement by requirement, test by test, you can easily find anything that breaks the created tests since you are only working one requirement at a time. I the first three requirements are met and tested when you work on adding the fourth and for some reason what you added to the method is breaking one of the successful test, you know exactly where the issue is.

I have the code here if you want to look at it as I’ve I’ve commented a lot of the code. It is in VS 2010 though. However I don’t think there’s anything that couldn’t work in 3.5.

I admit it’s kind of a different way of looking at it, but I found it incredibly useful in it’s simplicity.

Add Nunit Reference through NUGet/ Visual Studios 2010

From the “Just putting this here for me” update desk: NUget

What’s NUGet? It’s a way to help with adding things from templates to Add Ons. In fact, it can even be used to add references to your project like NUnit without having download NUnit by yourself. Basically it’s another way to enhance laziness. I like this.

The page for NUGet is here and you can download it from here.

After that restart Visual Studios (At least I had to) then:


From there:


Now there should be a button in that image but I had already added the NUnit reference. Real easy stuff.

Apparently there’s lot of stuff like add ons and templates… I think I already wrote that but I’m too tired and lazy to bother checking. Anywho a developer should be like candy in a kids store.

NUnit Hangs Up When Run Through Nant Using .Net 4.0

Ran into this one yesterday starting with Cruise Control not finishing. At first I just thought Cruise Control just wasn’t that into it, but turns out something was hanging up and that something was N-N-N-UNIT. Well to be more specific it was NUnit while being run through Nant although in the end it wasn’t Nant’s fault. Turns out it has to do the latest stable release of NUnit… 2.5.8.something.whatever.

The fix? Grab 2.5.9.yayayaya from the download page and use the nunit-console from that instead. I guess the whole issue had to do with the latest .Net 4.0 and the latest stable version of NUint. I guess they don’t like each other. They go together like water and something that doesn’t go well with water.