Getting Started with Nuget and Visual Studios 2012… or whatever it’s called now.

So if you’re like me, and I’m guessing you are since you are reading this, you have a sort of idiotic reaction to anything that takes setting up. This may have prevented you from using anything on linux, setting the clock in your car, and using Nuget. Now up until this point I have tried really hard to avoid Nuget due to its… unfortunate earlier life. However, this wasn’t due to the concept, but more of the completely insane mass assembly hoarding functionality that made it about as useful as … something that isn’t useful. Sorry, couldn’t come up with anything funny. Surprised, I’m sure.

So anyways, after about two hours of pure pain this afternoon, I got it to work. And it works LIKE IT SHOULD HAVE THIS WHOLE @#@!ING TIME.

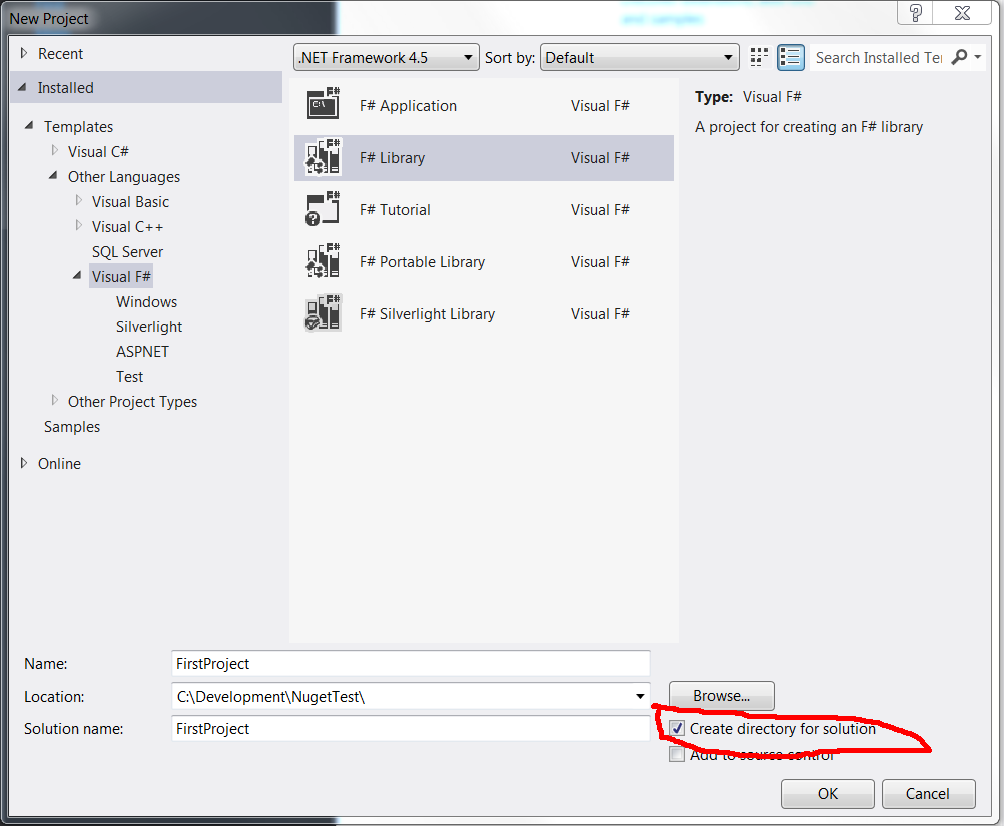
Ok first step is to just create a project. Excitement! One thing to make sure, or at least for this random mass of pointless I call a tutorial, that you have the “Create directory for solution.” checked.

Next is to create a second project. Yeah I know you weren’t ready for something as complicated as a solution with two projects, but that really doesn’t concern me.
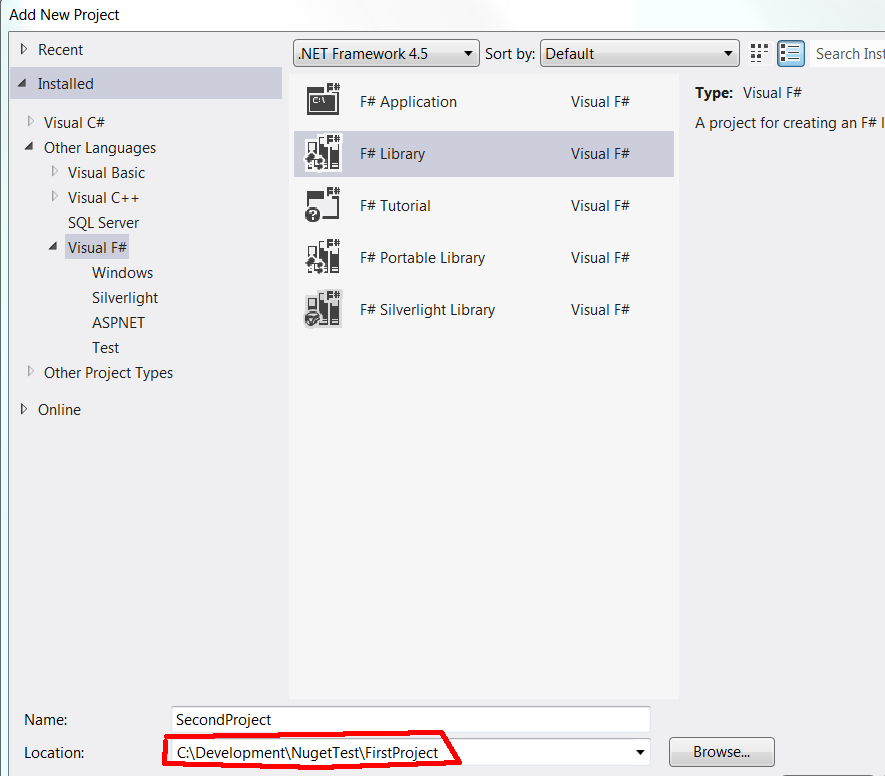

One note is that to make life easier make sure both projects are on the same level of the solution folder hierarchy thing… hence the awesome red trapezoid-ish thing in the picture.

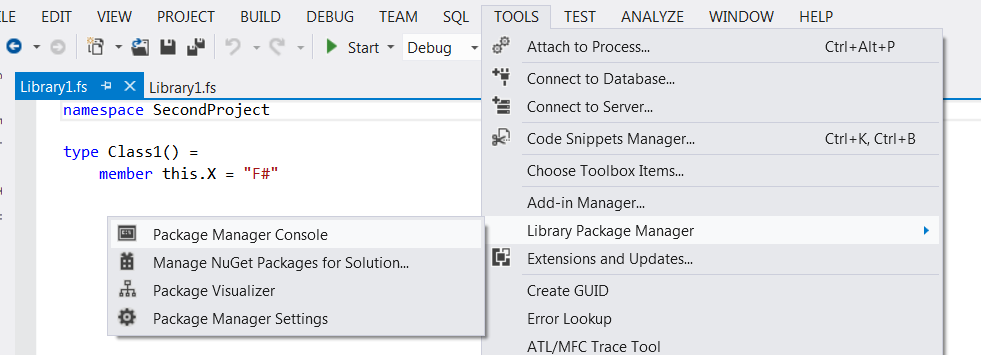
Next up is opening up the package manager that is nestled so comfortably in TOOLS -> Library Package Manager -> Package Manager Console:

This is basically a nifty command line like tool for Nuget which I personally prefer.

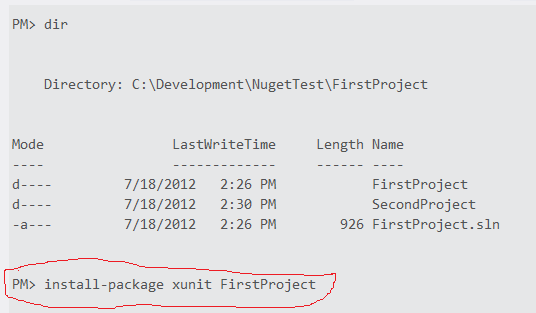
For the first project I added… waiting for Paint to open my awesome png that apparently is so awesome it is causing paint to freeze up. That’s right folk, freezing Paint is the true test of awesome. It’s that or Gimp is jealous that I used Paint. Not sure. Anyways, for the first project I added xunit.

Something of note is that the name of the project you are installing something too is known by the Package Manager Console. Really nice feature to assist with selecting the right project.

For the second project I added FsUnit.xunit… And somehow the image I just loaded into Gimp was almost instantaneous. Funny how that is.

Yippee. When you go to the directory through Windows Explorer you’ll notice the top level folder now has a packages folder.

This will be the folder all projects will refer to so you don’t have 20 different copies of Nunit for the 20 unit testing projects you have. Now if you go one step into FirstProject you’ll see that a packages.config file has been added. It is just a file that tells Nuget what packages (Assemblies) the project needs in the packages folder.

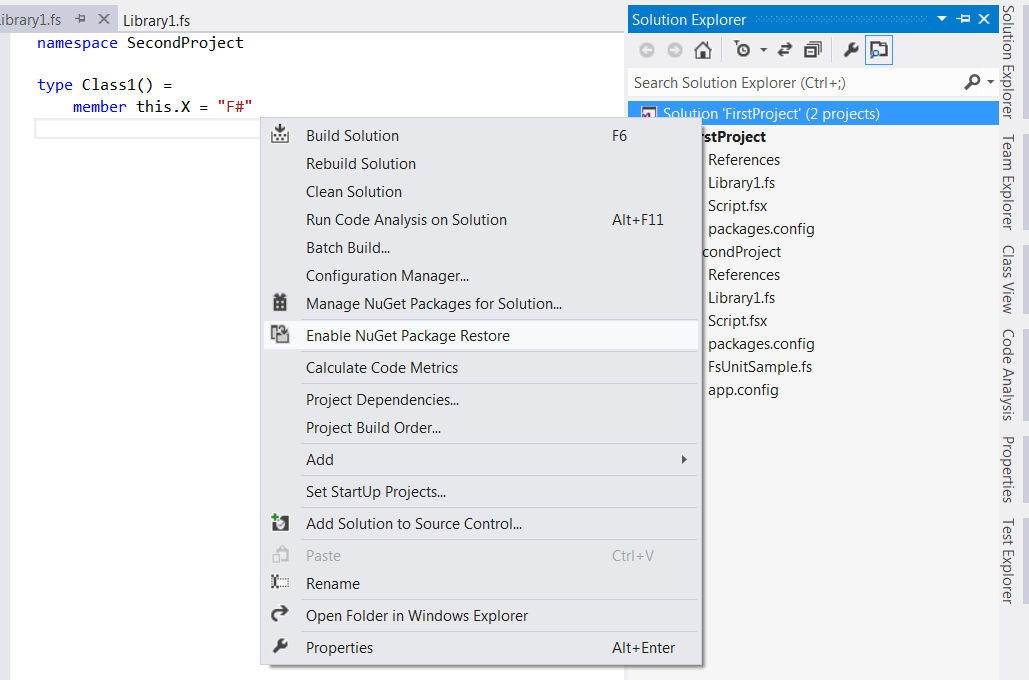
Almost done. The one last thing that is actually pretty nice is having Nuget/Visual Studio get all needed packages that are missing on Build. Right click the Solution item in the Solution Explorer -> Enable Nuget Package Restore

So now what you can do is close the solution, delete that top level packages folder, reopen the solution, build, and see that the top level packages folder has been recreated. This is a really nice feature that can help with sending a solution to source control, and not have to take the outside assemblies with it.

So there you go… Seriously that’s all I’ve got. Go home.
Create An X Delimited String From A Char List Using Linq Aggregate

A quick example of how to use the Aggregate method to create a string of delimited members, or in this case characters. You might wonder why this example, or at least you should. It’s true, the character list to delimited string is pretty useless, but some idiot from where I work needed it.

[TestMethod]
public void GetStringFromCharacters()
{
    var charList = Enumerable.Range(0, 10).Select(x => 'a').ToList();

    charList
        .Aggregate("", (inner, outer) => inner + outer.ToString() + ",")
        .Should()
        .Be("a,a,a,a,a,a,a,a,a,a");
}

The big thing here is the “” in the Aggregate method signature. That basically says that Inner is a string. If I didn’t have that specified, both inner and outer would be a character.

YAY

XUnit and Connection Strings

A real quick one but maybe a good one.

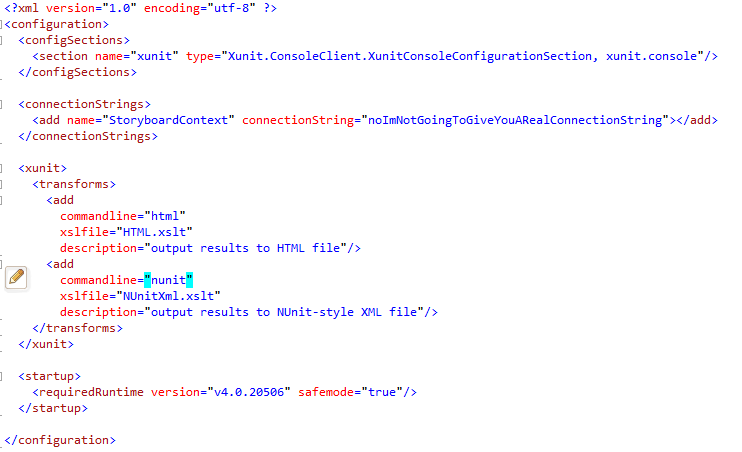
I was running the xUnit.gui.exe program to run units tests using xUnit… duh. Problem I ran into is that xUnit is not a part of the solution that the tests were. This caused issues when trying to run integration tests since the needed app.config wouldn’t be read by xUnit as the config file used when running an app is the config file from the topmost (Usually UI) project/application. So I made a wild guess that if I follow that logic, what little there may be, and add the connection strings to the xunit.gui.exe.config file as if it were an app.config/web.config, it should use the connection strings added… and turns out it did.

And there you have it… it being the solution and not a clown.

Fun with F# and Method Reduction

So the first and second methods came from this book , but I thought for fun I might reduce it further to see
how small a call could get.

Basically take a number and divide it by another number 3 times.

let bytesToGb item =
let itemB = item / 1024I
let itemC = itemB / 1024I
let itemD = itemC / 1024I

Is the same as:
let bytesToGb item =
let x = x / 1024I
let x = x / 1024I
let x = x / 1024I

And more reduction:
let bytesToGb item =
item
|> (fun x -> x/1024L)
|> (fun x -> x/1024L)
|> (fun x -> x/1024L)

Or more:
let divide x = x/1024L
let bytesToGb = divide >> divide >> divide

If you’re familiar with Func/Action, Linq, ect this might actually look a lot like some of the newer “functional like” additions to C#. Well at least the third one. Funny part, and I didn’t know this, is that most of the more interesting additions to C# (Generics, Linq, Lambda expressions) actually came from F#; Which was built to match other existing functional languages like Haskel)  Go figure.

Unit Testing 4.0 Web Forms Including Event Handlers Like Page_Load Using Dynamic

If you’re too lazy or just plain impatient, you can find the source code here.

So one of the biggest pains in a place that doesn’t lend itself well to be in pain has been trying to unit test web forms like how MVC controllers can be. Before 4.0, this was an aggrevation at the least. Something in between stubbing one’s toe and getting only chocolate icecrfeam when you ask for a @*&*ing swirl. Serious, how hard is it to pull the swirl lever? Really.

Anyways, so there are certain things in .net web forms that were pretty difficult to hande/mock/get around for testing. Let’s take session for instance. Session is a sealed class with a non public constructor. To make things more interesting, the Page class only has a get for the Session property. Now you could go through a lot of hell, mostly reflection, to get aroud this, but who wants to do that? Personally I gave web forms the ole one finger salute, but being that I am working with web forms again… yeah had to find a way to get around this. The answer? Stems from dynamic.

Basically what I had to do is create a class that has a Session property that is dynamic, and then replace the old Session call with a class that calls a property named Session. The effect to the code, as far as the immediate code behind is concerned, is just this simple adding of the class before the Session call. Far as the code to do this, it’s fairly easy too.

First I started with an interface since using an interface will help later if I need to mock.


This is the bread and butter. Basically we have a container that will hold the session object. Making the property dynamic allows it to be set to anything. All I have to worry about is that whatever I set it to has the functionality used by Session. This is started by implementing the interface fo use on the site:


And then one for use with testing:


How are these used? Well if we take a base page:


So what this does is holds two constructors; One for use by .Net when it runs the site and one for the test class when it is testing the page functionality. The second is a way to stop all the stuff that happens in the Page class constructor when it’s time to unit test this [explitive]. This might look familiar to people who have used things such as Dependency Injection with MVC to help with Controller testing. If not, the idea is simple. It basically just gives the Page the test handler we need it to use when testing. If we aren’t testing, then we let it just use the default handler.

You might wonder why I didn’t instantiate the live version in the constructor, and the answer is: Session isn’t ready to be used at constructor time when doing the normal web site thing. Therefore, it will be set the first time the SessionHandler property is called. If it’s a test, well then it’s fine to set it in the constructor since it is bypassing the normal web site… thing.

The unit test looks something like this:


As you can see, a test version of the handler is created and the Session object is replaced with a Dictionary since that’s what Session is… well it has more to it but the most used feature is the key/value match and it happens to be the only part of Session I show in this example.

Since there is the second, test only, constructor on the page, we don’t have to worry about any asp.net stuff getting in the way when instantiating the page. The page will look like this:


As it can be see, the replacement of the Session call with SessionHandler.Session allows the features of Session but also the testability it lacked for so long. It’s true that if you want to use other features of Session, if there are any and I can’t remember, you’ll have to just add them to the test version so they can be called at test time. I can’t do everything for you.

Test Driven Development… A Simplified Start

So I went to a “doctor’s appointment” yesterday and was asked to do some pair(ed?) programming to solve a simple-ish request. Basically it was:

Get a number in a list of integers that is closest to 0.

Sounds easy enough, right? Well there are a few more rules but nothing game breaking:

  • If the list contains a 0 then return 0
  • If the list is null then throw ArgumentNullException
  • If list is empty then throw ArgumentException
  • If there is no 0 then get the number nearest 0
  • If the closest is the same for positive and negative (Say -2 and 2), return the positive

Again, fairly simple thing to work on.

Right off the bat I set about creating the method for doing this since my usual plan is:

  1. Create method
  2. Unit test
  3. ???
  4. #$@%!

The fourth step is actually repeated a couple times.

So after I had done the more brute force sort of way, and had a failing test, it was suggested I start over. This time stick with the TDD like mindset of

  1. Create test
  2. Fail test
  3. Add code to make it work
  4. Watch it succeed

Now the concept of TDD I have known about for a while, but never really had a chance to really jump into it. After all, most companies just want something done now, not done well. Beyond that, I had reservations of how it works and whether I was smart enough to pull it off. After all, I had always thought you have to be able to see the whole method before it’s written in order to create tests. Well after yesterday I can say I was wrong… at least about the second part.

When I started writing test methods I was told to make them each this way:

Always add to a method the most simple way to get a test to run.

Yeah ok, it sounded better when I heard it yesterday. However, I have examples.

So if we take the first requirement:

If listToCheck contains a 0 then return 0

Well what should I write as a test? Easy:


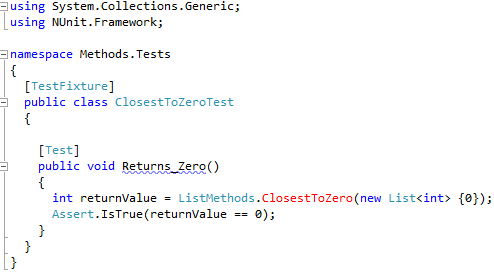
As you can see I am only checking to make sure there is a 0 returned. Side Note: You might notice that the method is red. This is because it hasn’t been created yet. That’s the next step. What should I put in the method? Remember I only want to put in the most simple way to get the test to pass.


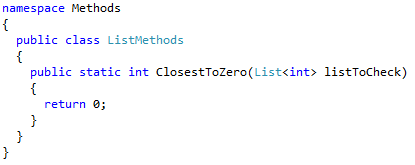
Which gives me this guy:


Right now you’re probably thinking that test is the programing equivalent of Master of the Obvious. I mean, of course it passes because it always returns 0. The next unit test might help with seeing the bigger picture:


Ok so now I’m testing:

If the list is null then throw ArgumentNullException

So naturally I have a test that expects an ArgumentNullException to be thrown. I don’t have that yet in the method though so the expected result when running the test is:


Boom. Go figure. Next step is to add only what is necessary to make the unit test pass.


Now you can see that I have added an exception to be thrown if the list is null. Time to run the tests:


Now I know that the method does take care of the first two requirements. From here I go requirement by requirement and create unit tests to make sure the requirements are met and have them all fail at first. After the test fails, add in the minimal amount of code necessary to get the test to pass.

Eventually you will have a working method that is completely covered.

You might be wondering why this site still exists but you might also be wondering why you should go requirement after requirement adding just what’s needed. The answer is actually simple: It lets you know exactly what changes you make breaks any other test. You see, if you were to do the normal “build the method and test” and there’s a test failing, it becomes harder to track down the issue since the method is now a bunch of code. Since there are multiple points of failure when you start writing the tests, tracking down a specific error is hard.

If you go requirement by requirement, test by test, you can easily find anything that breaks the created tests since you are only working one requirement at a time. I the first three requirements are met and tested when you work on adding the fourth and for some reason what you added to the method is breaking one of the successful test, you know exactly where the issue is.

I have the code here if you want to look at it as I’ve I’ve commented a lot of the code. It is in VS 2010 though. However I don’t think there’s anything that couldn’t work in 3.5.

I admit it’s kind of a different way of looking at it, but I found it incredibly useful in it’s simplicity.

MVC3, Entity Framework, jQuery… Everything example

How would you like to have a project that has these features?

Dependency Injection
Entity Framework 4.0 with POCO
Inversion of Control with Castle
The IResult
jQuery
jQuery Ajax Posts
jQuery Custom Css
jQuery Validation
Mocking with Rhino Mocks
MVC 3/Razor
MVC Annotation Based Validation
What I call the Repository Pattern
Unit Tests - Integration With Entity Framework
Unit Test - MVC Controller Actions

And more s--t I can't think of right now!

What’s the price of this gem? Just your time which is worth nothing!

Where can you find it? Right here!

Requirements:

Visual Studios 4.0
Mvc 3
To open the solution and do a search and replace on "Tutorial" to set your directory paths.
A real f--king need to learn!

Act now, operators aren’t in existence since this is hosted on a website, but if they were they would be standing by!

Disclaimer:

This may or may not hit you with a wave of awesome. Be prepared for the worse case awesome scenario. I am in now way responsible for any heart stoppage due to the shock and awe power of the project.

Pycharm: Change Error Alert Color/Style

Once again I’m using my blog to help remind myself of something later, but you know what? I’m OK with that.

Took a little bit to find this one, but changing the color of Errors and Warnings makes it hell of lot easier to find them. Go figure that the default “barely more grey than white” color doesn’t do the same.

Anyways:

File -> Settings -> IDE Settings -> Colors & Fonts -gt; General

At that point you’ll see stuff to the left with a bunch of colors. (Default Text) Just click on either Error or Warning to change them. After you’ve done that, feel free to go back to your project and find all the errors you couldn’t see before. It’s OK that you have errors though. Awesome as I am, even I make mistakes. Haha just kidding. Be ashamed of yourself.

Mock SQLAlchemy scoped_session query and Why Python is My BFF

sqlAlchemy has sessionmaker to create a session from which you can use query to get whatever you need. For example:

someSession.query(SomeTableRepresentationObject).filter...ect

If you’ve used sqlalchemy, nothing new going on here but it wouldn’t be me if I didn’t point out the obvious and take three sentences to do so.

Now what you may run into is something like this:

def getCountOfUsersByUserName(userName, session):
  return session.query(User).filter(User.userName == userName).count()

Ok now that I typed that out, I see it’s kind of a dumb method. But f–k it, what’s done is done.

Now from a testing situation, this could look tough. After all if you come from a more static language background like I did, you should know how hard things can be to mock at times. (.Net Session… I’m looking at you with judging eyes. Sooooo judging.) But this isn’t a static language, it’s Python.

For purposes of making things less confusing, which is hard for me, when I use the word “Object” I mean method OR class. And remember as always, “banana” is the safe word.

You see, to mock that out all you need is an object that has a query object that takes in something and a filter object on the query object that takes in something and has a count method on it. Yeah that totally makes sense. Try working it backward.

Filter has one parameter and a count method on it. Whatever that parameter is, it doesn’t matter since it is Python. As long as Filter takes in one parameter, you have a winner.

Query, like Filter, takes in one parameter and has a object named Filter on it. Once again, it doesn’t matter what’s passed into Query, just that it takes something in.

Session is basically an object that has no parameters and has a Query object on it.

Now in a static language, this would be annoying. You would need 3 interfaces and mock a whole ton of stuff dynamically with something like Rhino Mocks or just create a bunch of classes of those interfaces that you can pass in. Either way, there are complications. Once you get into things like Web Session or ViewState, it’s a ton of work. Python? Eh, you can do it in 20ish lines. How you ask? Well I’ll show you how!

	class mockFilter(object): #This is the ONE parameter constructor
		def __init__(self):
			self._count = 0
			self._first = dynamicObject()

		def first(self):  #This is the another method that's just coming along for the ride.
			return self._first

		def count(self):  #This is the needed Count method
			return self._count

	class mockQuery(object): #This is the ONE parameter constructor
		def __init__(self):
			self._filter = mockFilter()

		def filter(self, placeHolder): #This is used to mimic the query.filter() call
			return self._filter 

	class mockSession(object):
		def __init__(self):
			self._query = mockQuery()
			self.dirty = []

		def flush(self):
			pass

		def query(self, placeHolder):  #This is used to mimic the session.query call
			return self._query

  #and this... THIS IS SPARTA!!1111... yeah I know, I'm about 3 years too late on that joke.

How does this work? Say I have the method from above:

def getCountOfUsersByUserName(userName, session):
  return session.query(User).filter(User.userName == userName).count()

I could test it using this:

  session = mockSession()
  session.query('').filter('')._count = 0 #Initialize the mock session so it returns 0 from count()

  getCountOfUsersByUserName('sadas', session)

And boom, you have mocking in ten minutes or less or your code is free.

As you can see, the highly dynamic nature of Python makes it a great fit for any project that will need unit tests and mocking. And which project doesn’t? You know what I’m sayin’? You now what I’m saying’? High five!

Note: dynamicObject is …. nothing but a cheesy class that inherits Object but has nothing on it. (Turns out that if I did someObject = Object() I couldn’t do this since Object by default doesn’t contain the ability to add things dynamically… and this was by design.)

And yes, I just quoted myself. I am that awesome.

jQuery Validation with Multiple Checkboxes

So this one is done on request and because I am a kind of merciful god I will grant this request.

For those bullet point programmers:

Now when I say validation, I mean the validation plugin. and this example is built using concepts in this post.

Here’s the markup:

 
<form id="formCheckBoxValidation" method="post" action="checkboxValidation.html">
	<input type="checkbox" id="checkBoxList" name="checkBoxList" value="One">
	<input type="checkbox" id="checkBoxList" name="checkBoxList" value="Two">
	<input type="checkbox" id="checkBoxList" name="checkBoxList" value="Three">
	<input type="checkbox" id="checkBoxList" name="checkBoxList" value="Four">
	<input type="checkbox" id="checkBoxList" name="checkBoxList" value="Five">
	<br />
	<input type="submit" id="buttonCheckBoxValidation">
</form>
<div>
	<div id="divError" name="divError" style="display:none;"></div>
</div>

<form id="formCheckBoxValidationDifferentName" method="post" action="checkboxValidation.html">
	<input type="checkbox" id="checkBoxListOne" name="checkBoxListOne" value="One">
	<input type="checkbox" id="checkBoxListTwo" name="checkBoxListTwo" value="Two">
	<input type="checkbox" id="checkBoxListThree" name="checkBoxListThree" value="Three">
	<br />
	<input type="submit" id="buttonCheckBoxValidationDifferentName">
</form>
<div>
	<div id="divErrorDifferentName" name="divErrorDifferentName" style="display:none;"></div>
</div>

For this example I’m actually presenting two examples(Say ‘example’ again, I dare you, I double dare you m—erf—er, say ‘example’ one more God d–n time!): If the checkboxes are linked by id and if the checkboxes are not linked at all. There is actually a difference. You see, if they share the same id, the required method can be used since it will treat them all as the same element and therefore if even on is checked, there is a value. Otherwise, you have to check all the checkboxes to see if at least one is checked. (Yeah, that made total sense.)

Here’s the check checkboxes method:

//Add a method to the validator that checks to see if at least one of the
//  three checkboxes specified are checked.
jQuery.validator.addMethod(‘atLeastOneChecked’, function(value, element) {
	var checkedCount = 0;

	if (jQuery(‘#checkBoxListOne’).is(‘:checked’)){
		checkedCount += 1;
	}

	if (jQuery(‘#checkBoxListTwo’).is(‘:checked’)){
		checkedCount += 1;
	}

	if (jQuery(‘#checkBoxListThree’).is(‘:checked’)){
		checkedCount += 1;
	}

	return checkedCount > 0;
});

Oooooh baby.

Now for setting up the validation:

//This is for the first checkbox area where every checkbox has the same id causing them
//  to be a group and therefore the default required works.
var validationRules = new Object();
validationRules['checkBoxList'] = {required:true};

var validationMessages = new Object();
validationMessages['checkBoxList'] = {required:'at least one has be checked.'};

jQuery('#formCheckBoxValidation').validate({
	errorLabelContainer: '#divError',
	wrapper: 'div',
	rules: validationRules,
	messages: validationMessages,
	onfocusout: false,
	onkeyup: false,
	submitHandler: function (label) {
		alert('hooray');
	}
});

//This is for the second checkbox area where every checkbox has a different name
//  and therefore the atLeastOneChecked method must be used.
validationRules = new Object();
validationRules['checkBoxListOne'] = {atLeastOneChecked:true};

validationMessages = new Object();
validationMessages['checkBoxListOne'] = {atLeastOneChecked:'at least one has be checked.'};

jQuery('#formCheckBoxValidationDifferentName').validate({
	errorLabelContainer: '#divErrorDifferentName',
	wrapper: 'div',
	rules: validationRules,
	messages: validationMessages,
	onfocusout: false,
	onkeyup: false,
	submitHandler: function (label) {
		alert('hooray');
	}
});

In the words of Q-Bert: @#$% yeah!