Handle Events and Add Controls to Script Controls (ASP.Net ScriptControl)

[Part One] [Part Two] [Part Three] [Part Four] [Part Five]

Ok in the last post I went over the creation of a web control. Simple enough as you can see. Now it’s time to screw around with Controls and how to capture their events client side. Something only a brilliant person like me could figure out… I so wish that were true. I could make millions.

Let’s add a control to the eh… control. Say we want to throw an alert everytime a person focuses on a textbox. Yes, that’s really stupid but it’s easy so live with it. Let’s use the class from the other post:

  public class ScriptControlExample : ScriptControl , INamingContainer
  {
     private TextBox textboxStupid;

     protected override void CreateChildControls()
     {
       base.CreateChildControls();

       textboxStupid = new TextBox();
       textboxStupid.ID = "textboxStupid";
       Controls.Add(textboxStupid);
     }

      protected override IEnumerable<ScriptDescriptor> GetScriptDescriptors()
      {
        ScriptControlDescriptor desc = new ScriptControlDescriptor
          ("Test.Examples.Client.ScriptControlExample", ClientID);
        desc.AddProperty("textboxStupid", textboxStupid.ClientID);

        return new ScriptDescriptor[] { desc };
      }

      protected override IEnumerable<ScriptReference> GetScriptReferences()
      {
         return new ScriptReference[] { new ScriptReference
           ("Test.Examples.ScriptControlTemplate.ScriptControlExample.js", "Test.Examples") };
      }
    }

Notice anything new? I added a textbox, created it in the CreateChildControls method, then added soemthing new to the GetScriptDescriptors method. Remeber the GetScriptDescriptors method is used to send values to the client from the server. Here I am sending the clientID of the textbox… can you guess why? That’s right, because I’m going to use it to find the control client side. Now for the JavaScript end.

  if (Type)
  {
    Type.registerNamespace("Test.Examples.Client");
  }

  NDI.WebControls.Client.GenericAutoComplete = function(element)
  {
      NDI.WebControls.Client.GenericAutoComplete.initializeBase(this, [element]);

      //Textbox ID value
      this._textboxStupidID = "";
      //Textbox Control
      this._textboxStupid = null;
      //Event Handler
      this._textboxStupidOnFocus = null;
  }

  Test.Examples.Client.ScriptControlExample.prototype =
  {
    //Properties for the _textboxStupidID field
    get_textboxStupidID : function()
    {
        return this._textboxStupidID;
    },

    set_textboxStupidID : function(value)
    {
        this._textboxStupidID = value;
    },

    //Method to be called on focus
    handleOnTextBoxFocus : function(e)
    {
        alert('hi');
    },    

     initialize: function()
    {
        //Find and set the textbox field using the passed in ID
        this._textboxStupid = $get(this._textboxStupidID);

        //Create a delegate to handle the onFocus event
        //Basically creating a means to call the handleOnTextBoxFocus method
        this._textboxStupidOnFocus = Function.createDelegate(this, this.handleOnTextBoxFocus);

        //Set the onFocus event to be handled
        $addHandler(this._textboxStupid, "focus", this._textboxStupidOnFocus);

        Test.Examples.Client.ScriptControlExample.callBaseMethod(this, 'initialize');
    },

    dispose: function()
    {
        //Remove the event handling when this is all said and done.  A clean up.
        $removeHandler(this._textboxStupid, "focus", this._textboxStupidOnFocus);
        Test.Examples.Client.ScriptControlExample.callBaseMethod(this, 'dispose');
    }
  }
  //Same as before
  Test.Examples.Client.ScriptControlExample.registerClass(
    'Test.Examples.Client.ScriptControlExample', Sys.UI.Control);

Oooooooooook So some added things, yes? Well I’ll go through them:

  NDI.WebControls.Client.GenericAutoComplete = function(element)
  {
      NDI.WebControls.Client.GenericAutoComplete.initializeBase(this, [element]);

      //Textbox ID value
      this._textboxStupidID = "";
      //Textbox Control
      this._textboxStupid = null;
      //Event Handler
      this._textboxStupidOnFocus = null;
  }

This is basically declaring the fields for the class and setting their defaults. For this example we’ll need the field to hold the ID in, a field to represent the textbox oject, and a field to represent the delegate later on used to hook up the onFocus Event.

Note: In the next bit you will notice that every method/property is followed by a comma. Do not forget that.

Next, let’s look at the actual class definition. First we’ll start at the properties:

  Test.Examples.Client.ScriptControlExample.prototype =
  {
    //Properties for the _textboxStupidID field
    get_textboxStupidID : function()
    {
        return this._textboxStupidID;
    },  //SEE COMMA

    set_textboxStupidID : function(value)
    {
        this._textboxStupidID = value;
    },  //ANOTHER COMMA

    .....

First thing you’ll notice is the :fuction notation. This is used to declare both methods and properties. Nothing huge, just something to note.

Second thing you might notice is that the property names look a little hard coded and you would be right. Remember how the value send out from the class file was named “textboxStupidID”? Well guess what, for .net to be able to attach that value to a client property, you have to name the properties exactly the same with with either get_ or set_ preceding. Not perfect, but since I’m the only perfect thing in existence, I guess it will have to do.

Now onto the method we need:

    ....

    //Method to be called on focus
    handleOnTextBoxFocus : function(e)
    {
        alert('hi');
    },  

    ....

Wow… uh well it’s a method and it takes in an argument. What the hell do you want from me?

Onto the intialization/Constructorish thing:

     initialize: function()
    {
        //Find and set the textbox field using the passed in ID
        this._textboxStupid = $get(this._textboxStupidID);

        //Create a delegate to handle the onFocus event
        //Basically creating a means to call the handleOnTextBoxFocus method
        this._textboxStupidOnFocus = Function.createDelegate(this, this.handleOnTextBoxFocus);

        //Set the onFocus event to be handled
        $addHandler(this._textboxStupid, "focus", this._textboxStupidOnFocus);

        Test.Examples.Client.ScriptControlExample.callBaseMethod(this, 'initialize');
    },

This might be the least easy part of the whole thing. The first commentented area:

    this._textboxStupid = $get(this._textboxStupidID);

Simple just gets the textbox by the passed in ID. I swear this will get more complicated.

    this._textboxStupidOnFocus = Function.createDelegate(this, this.handleOnTextBoxFocus);

This gives a variable that points to the method we want to use when the focus event fires. Still waiting for complicated…

   $addHandler(this._textboxStupid, "focus", this._textboxStupidOnFocus);

This assigns the method we want, through the delegate, to the focus event on the textbox. Hrm. Ok so not really complicated. Just messy looking. One this to note though is that the events on all the controls won’t have the “on” prefix. So if you can’t figure out why you’re getting an error because it can’t find the event, try dropping the “on”.

And there you have it. Now you are free to run it and be really annoyed by how dumb this example was. Next will be using this for the power of evil by adding an autocomplete control with a processing image.
Creating Script Controls And Love (ASP.Net ScriptControl)

[Part One] [Part Two] [Part Three] [Part Four] [Part Five]

So this will be the first of a couple posts having to do with Script Controls, the Ajax Control Tool Kit AutoComplete control, and Javascript. Now to get started, what’s a script control?

I’m glad you asked. Basically have you ever created a user control that required Javascript to go along with it? What if the control was in another assembly? Oh woe is you. Well you could require the .js file to be placed in the web project and included on the page. Meh. OR you could use a script control YAY! How does that help? Well it allows you to “attach” a javascript file to a control in a class library, no includes needed. Not only that, but you can pass values from the control to the client and use them with Javascript. (This includes ids of controls in the control.)

So what’s needed? Well…
1. Create a class library, Call it Test and make the default Namespace Test.Examples

2. Create a folder to hold the class file and the JavaScript file. Let’s call it ScriptControlTemplate for now.

2. Create the control class file and the needed JavaScript file. Call them both ScriptControlExample. (For right now it will be easier if they have the same name but they don’t have to be.)

3. Right click the JavaScript Files -< Properties -< Build Action: Embedded Resource

4. Go to the Properties folder in the class Library and open the AssemblyInfo.cs. Add this line:

[assembly: WebResourceAttribute
    ("Test.ScriptControlTemplate.ScriptControlExample.js", "text/javascript")]

Now you might notice something, that almost looks like the actual folder location and it kind of is. In order for this line to work, it has to match the folder location like when Visual Studios creates a Namespace automatically. It uses the directory name as the final part of the namespace. Although to note, the Namespace of the class DOES NOT have to match this. It just has to reflect the directory structure of where the .js file is.

Ok so now we have a blank .cs file and a blank .js file. Woo hoo. Now what? Well first you need to have the class inherit from System.Web.UI.ScriptControl and override two protected methods

    public class ScriptControlExample : ScriptControl , INamingContainer
    {
        protected override IEnumerable<ScriptDescriptor> GetScriptDescriptors()
        {
            ScriptControlDescriptor desc =
                 new ScriptControlDescriptor("Test.Examples.Client.ScriptControlExample", ClientID);
        }

        protected override IEnumerable<ScriptReference> GetScriptReferences()
        {
          return new ScriptReference[] {
              new ScriptReference("Test.Examples.ScriptControlTemplate.ScriptControlExample.js", "Test.Examples") };

        }
    }

Ok so I cheated a little and put in two lines that you will need anyhow. I figured it would save some time, mainly mine. Cause let’s face it, I don’t really care about yours.

The first method GetScriptDescriptors is where we will be putting any values we want to send to the Client. The second just tells the system where the JavaScript file is to load. For now you won’t be doing anything with the second.

Ok now on to the Javascript file. Basically you have some cannon methods to add just to get the thing to work, and I’ll be honest: It’s extremely complicated and you probably won’t be smart enough to figure it out.

//Set the namespace
if (Type)
{
    Type.registerNamespace("Test.Examples.Client");
}

//Won't be doing much with this for the examples I have
Test.Examples.Client.ScriptControlExample = function(element)
{
    Test.Examples.Client.ScriptControlExample.initializeBase(this, [element]);
}

//This is where you basically define the class
Test.Examples.Client.ScriptControlExample.prototype =
{
    //Where you want to place constructor like code
    initialize: function()
    {
        Test.Examples.Client.ScriptControlExample.callBaseMethod(this, 'initialize');
    },

    //Remove events and such here
    dispose: function()
    {
        Test.Examples.Client.ScriptControlExample.callBaseMethod(this, 'dispose');
    }
}
Test.Examples.Client.ScriptControlExample.registerClass('Test.Examples.Client.ScriptControlExample',
   Sys.UI.Control);

Phew that was complicated right?

Ok so now you have what you need to create a script control. Run it and well nothing will really happen except you shouldn’t get errors.

Now just create a new page in a web application (Or project if you’re a loser) and just do this realy quick:

<%@ Register Assembly="Test.Examples"
    Namespace="Test.Examples.ScriptControlTemplate" TagPrefix="test" %>

<html xmlns="http://www.w3.org/1999/xhtml" >
<head runat="server">
</head>
<body>
    <form id="form1" runat="server">
    <div>
        <asp:ScriptManager ID="smMain" runat="server" />
        <test:ScriptControlExample ID="sceTest" runat="server" />
    </div>
    </form>
</body>
</html>

Run it and…..NOTHING! Surprise! Actually there is something, just nothing visual yet. Next post will get to that. Sucker.

One thing you can take away from this: A drinking game. Take a drink everytime you see the word ‘Ok’ in this post. I dare you.

Microsoft Charting Controls: Adding Charts Dynamically

So this is kind of repost as I had already posted this at StackOverflow but I thought it might have some merit here. Whatever. Charts are hot right now so I’m going to push the damned bandwagon. You don’t like it? Well then go do something to yourself that you would consider rude for me to suggest it. Anyways, this might have been overkill but hey, that’s me.

protected void Page_Load(object sender, EventArgs e)
{
Bench benchList;
FoodIntake foodIntakeList;
Panel panelChartHolder;

panelChartHolder = new Panel();
Controls.Add(panelChartHolder);

benchList = Bench.GetAll();
AddNewCharts(benchList, panelChartHolder, GetBenchXValue, GetBenchYValue);

foodIntakeList = FoodIntake.GetAll();
AddNewCharts(foodIntakeList, panelChartHolder, GetFoodIntakeXValue, GetFoodIntakeYValue);
}

Ok so this first part is simple. Create a panel to hold the charts you are adding, get the lists you want represented by the charts and call the method to create the charts.

  private void AddNewCharts(T[] listToAdd, Panel panelToAddTo,
     Func<T, DateTime> xMethod, Func<T, Int32>)
  {

    ChartArea mainArea;
    Chart mainChart;
    Series mainSeries;

    mainChart = new Chart();
    mainSeries = new Series("MainSeries");

    for (Int32 loopCounter = 0; loopCounter < listToAdd.Length; loopCounter++)
    {
      mainSeries.Points.AddXY(xMethod(listToAdd[loopCounter]),
        yMethod(listToAdd[loopCounter]));
    }

    mainChart.Series.Add(mainSeries);
    mainArea = new ChartArea("MainArea");
    mainChart.ChartAreas.Add(mainArea);

    panelToAddTo.Controls.Add(mainChart);
  }

As you can see, I just created a new chart, added a series to it, and added a ChartArea to it. Next part is pretty much just looping through the collection and adding each item in it to the list itself. It uses the passed in delegate methods (Func) to get the X and Y values.

Last part holds the four methods responsible for getting the X and Y values from the two lists. Basically I did this to allow the chart creating method to be a generic as possible. Might be overkill.

  private DateTime GetBenchXValue(Bench currentBench)
  {
    return currentBench.DateLifted;
  }

  private Int32 GetBenchYValue(Bench currentBench)
  {
    return currentBench.BenchAmount;
  }

  private DateTime GetFoodIntakeXValue(FoodIntake currentIntake)
  {
    return currentIntake.DateEaten;
  }

  private Int32 GetFoodIntakeYValue(FoodIntake currentIntake)
  {
    return currentIntake.Calories;
  }

And so when you run this, you will get two graphs side by side. Mind you, they will be very plain as there are million different properties that can be set to improve the look. I guess the main point of this was to show that it’s pretty easy to create graphs dynamically using any kind of object list. You know what? Screw you. This is my blog and I’ll post whatever I want to. If you don’t like that then you can just come back at a later time and read something else I post. Yeah so there.

  using System;
  using System.Web.UI.DataVisualization.Charting;
  using System.Web.UI.WebControls;

Microsoft Charting Control: So easy an idiot can use it… And I have.

So just recently it was announced that there was a new charting control out for .Net/Visual Studios so I thought I would give it shot. How hard could it be? Well considering it took me 2? years to figure out my Playstation 3 had a wireless card, an uphill battle wasn’t out of the question.

So what the hell has to be done first? Well you need the 3.5 Framework (Sucks if you don’t have that) and service pack 1 (Which doesn’t suck as much but still annoying. I WANT EASY THINGS).
Have those? Great, way to be in the know. Now for the next step, more downloads. Here is the charting install and you need this too to see the actual tool in your toolbox. AMAZING. Now you just have to run the installs, which oddly enough are easy to do. First time for everything.

So now you have them installed right? Ok well do the normal project create/startup, add a new page, and view Design. Go to the old toolbox and look under the Data tab. (Don’t ask me why it’s there because I don’t know and will be compelled to cut you.) Now under the chance you don’t see it there you either didn’t install the second download or you have to add the namespace the control falls under. No problem. Just right click the Data tab and select “Choose Items”. Now in the.Net Framework Components tab look for the Namespace “System.Web.UI.DataVisiualization.Charting” and you should see the name Chart to the right of it. Select that item.

Ok, so now there should be a Chart control in your ToolBox in the Data Tab. You can now drag that thing over. Now in the markup you should see:

<asp:Chart ID=”Chart1″ runat=”server”>
<Series>
<asp:Series Name=”Series1″></asp:Series>
</Series>
<ChartAreas>
<asp:ChartArea Name=”ChartArea1″></asp:ChartArea>
</ChartAreas>
</asp:Chart>

If that doesn’t excite you, then I don’t know what will. Anyhow, it’s actually very simple. Series is the line or whatever you are representing the data as and the chart area is what holds the series(s). Seems easy enough, but don’t worry, it gets easier. Now for this example I’m going to actually have two series and they are going to represent amount of weight Bench Pressed and the caloric intake for a given day. Best thing I could come up with right now since today was bench day.

<asp:Chart ID=”chartMain” runat=”server”>

<Series>
<asp:Series Name=”seriesBenchAmount” />
<asp:Series Name=”seriesFoodIntake” />
</Series>
<ChartAreas>
<asp:ChartArea Name=”chartAreaMain” />
</ChartAreas>
</asp:Chart>

Yeah that’s pretty good. So now what I need is to throw some fake data at it, and to do that I created a Bench table and a FoodIntake table followed by using Linq To Sql to create the needed classes. When all was said and done I could easily do this:

  private const String CHART_AREA_MAIN = "chartAreaMain";
  private const String SERIES_BENCH_AMOUNT = "seriesBenchAmount";
  private const String SERIES_FOOD_INTAKE = "seriesFoodIntake";

  protected void Page_Load(object sender, EventArgs e)
  {
    Bench[] benchList;
    Series currentSeries;
    FoodIntake[] foodIntakeList;

    benchList = Bench.GetAllBenches();
    currentSeries = chartMain.Series[SERIES_BENCH_AMOUNT];
    for (Int32 loopCounter = 0; loopCounter < benchList.Length; loopCounter++)
    {
      currentSeries.Points.AddXY(benchList[loopCounter].DateLifted,
         benchList[loopCounter].BenchAmount);
    }

    foodIntakeList = FoodIntake.GetAll();
    currentSeries = chartMain.Series[SERIES_FOOD_INTAKE];
    for(Int32 loopCounter = 0; loopCounter < foodIntakeList.Length; loopCounter++)
    {
      currentSeries.Points.AddXY(foodIntakeList[loopCounter].DateEaten,
          foodIntakeList[loopCounter].Calories / 10);
      }
  }

Now believe it or not, that’s all you have to do to get a graph. Pretty easy to say the least. Now the graph that you get will be default everything (And in this case it gives you a bar graph) but still at least that’s something to work with. (Note that I cheated with the food intake by dividing by 10. Unfortunately the graph would look odd with a day of 3500 calories and a 325 bench.)

Now maybe you want this to be a line graph… Whatever can we do?

protected override void CreateChildControls()
{
    base.CreateChildControls();
    Series currentSeries;
    ChartArea currentArea; 

    currentSeries = chartMain.Series[SERIES_BENCH_AMOUNT];
    currentSeries.XValueType = ChartValueType.DateTime;
    currentSeries.YValueType = ChartValueType.Int32;
    currentSeries.ChartType = SeriesChartType.Line;
    currentSeries.BorderWidth = 3; currentSeries.MarkerStyle = MarkerStyle.Square;

    currentSeries = chartMain.Series[SERIES_FOOD_INTAKE];
    currentSeries.XValueType = ChartValueType.DateTime;
    currentSeries.YValueType = ChartValueType.Int32;
    currentSeries.ChartType = SeriesChartType.Line;
    currentSeries.MarkerStyle = MarkerStyle.Circle;
    currentSeries.MarkerColor = Color.Red;
    currentSeries.BorderWidth = 3;

    currentArea = chartMain.ChartAreas[CHART_AREA_MAIN];
    currentArea.Area3DStyle.Enable3D = false;
}

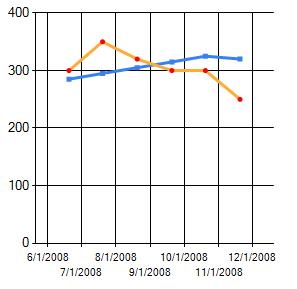
So what’s all this? Well this:

I MADE THIS!!11
I MADE THIS!!11

So pretty, yah? So what does it all mean?

    currentSeries.XValueType = ChartValueType.DateTime;
    currentSeries.YValueType = ChartValueType.Int32;

Well this is pretty simple, this merely sets the types for the X and Y axis. I told you it was simple.

    currentSeries.ChartType = SeriesChartType.Line;

If you can’t figure that one out, try another profession like engineering.

    currentSeries.MarkerStyle = MarkerStyle.Circle;
    currentSeries.MarkerColor = Color.Red;

Ok these three things are used to control how the points on the lines (Markers) actually look. Pretty self explanatory once the word “marker” is translated.

    currentSeries.BorderWidth = 3;

This is the thickness of the line itself.

    currentArea.Area3DStyle.Enable3D = false;

If you guessed this was a way to make the grid 3d, you were right on and probably able remind yourself to breathe at a maximum 3 times a day.

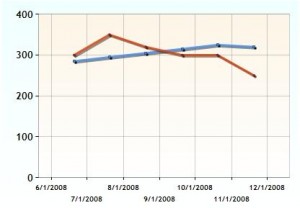
So now you are thinking you have this down to an expert level and I say,”sure why not?” ‘cept with a little work on the mark up I could make it look like this:

OoooOooOo
OoooOooOo

And just like Beloch said in Raiders of the Lost Arc before his face exploded, “It’s Bewtifewl!”

Now for the Usings!!11

    using System;
    using System.Drawing;
    using System.Web.UI.DataVisualization.Charting;

And the final markup:

<asp:Chart ID=”chartMain” runat=”server” Palette=”EarthTones” BackColor=”Azure” ImageType=”Jpeg” ImageLocation=”~/ChartImages/ChartPic_#SEQ(300,3)” Width=”412px” Height=”296px” BorderDashStyle=”Solid” BackGradientStyle=”TopBottom” BorderWidth=”2″ BorderColor=”181, 64, 1″>
<series>
<asp:Series Name=”seriesBenchAmount” MarkerSize=”3″ BorderWidth=”3″ ShadowColor=”Black” BorderColor=”180, 26, 59, 105″ Color=”220, 65, 140, 240″ ShadowOffset=”2″ />
<asp:Series Name=”seriesFoodIntake” MarkerSize=”3″ BorderWidth=”3″ ShadowColor=”Black” BorderColor=”180, 26, 59, 105″ Color=”220, 224, 64, 10″ ShadowOffset=”2″ />
</series>

<chartareas>
<asp:ChartArea Name=”chartAreaMain” BorderColor=”64, 64, 64, 64″ BorderDashStyle=”Solid” BackSecondaryColor=”White” BackColor=”OldLace” ShadowColor=”Transparent” BackGradientStyle=”TopBottom”>
<area3dstyle Rotation=”25″ Perspective=”9″ LightStyle=”Realistic” Inclination=”40″ IsRightAngleAxes=”False” WallWidth=”3″ IsClustered=”False” />
<axisy LineColor=”64, 64, 64, 64″>
<LabelStyle Font=”Trebuchet MS, 8.25pt, style=Bold” />
<MajorGrid LineColor=”64, 64, 64, 64″ />
</axisy>
<axisx LineColor=”64, 64, 64, 64″>
<LabelStyle Font=”Trebuchet MS, 8.25pt, style=Bold” />
<MajorGrid LineColor=”64, 64, 64, 64″ />
</axisx>
</asp:ChartArea>
</chartareas>
</asp:Chart>

Skins in ASP.Net and how behind I am

So something that has been around for while that I just stumbled upon is Skinning. Basically, this allows you to sent a certain look (using style sheets) for every control in the site. This even includes the built in controls like Tables and Textboxes. How is this done? Well maybe I can tell you.

First you have to go to your project and right click (yes I could make images, but honestly that’s more work than needed.) the project itself. Add -> Add Asp.net Folder -> Theme.

Yay, you have a folder. Sweet. Now you actually have to add the skin itself. Guess what you have to right click? Yes, the new folder. Add -> New Item -> Skin File. Name it whatever (I say you call it Basic because that’s what I called it for this example) and open it up.

Now you have to create a .css file, if you don’t already have one, and for this example let’s say you make one called SkinMe.css. Now you get to add these meaningless classes:

.defaultTable
{
    width:500px;
    border-color:Black;
    border-style:solid;
    border-width:thin;
}

.defaultTable tr
{
    width:500px;
    background-color:Navy;
}

.defaultTable td
{
    color:Red;
}

.nonDefaultTable
{
    width:300px;
    border-color:Black;
    border-style:dotted;
    border-width:thick;
}

.nonDefaultTable tr
{
    width:500px;
    background-color:Navy;
}

.nonDefaultTable td
{
    color:Red;
}

Basically, I have two different classes for tables, with really only one difference. (border-style:dotted) Now you need that actual markup file to hold these wonderful tables:

    <asp:Table ID="tableSkinDefault" runat="server">
        <asp:TableRow ID="tableRowSkinDefault" runat="server" >
            <asp:TableCell ID="tableCellSkinDefault" runat="server" >
                hihihi
            </asp:TableCell>
        </asp:TableRow>
    </asp:Table>

    <asp:Table ID="tableNonDefault" runat="server" SkinID="nonDefaultSkin" >
        <asp:TableRow ID="tableRowNonDefault" runat="server" >
            <asp:TableCell ID="tableCellNonDefault" runat="server" >
                hihihi
            </asp:TableCell>
        </asp:TableRow>
    </asp:Table>

Now you might notice that the second table is using the SkinID tag. This will make sense in the next part. Have your skin file open? Gooood. Now just paste this into it:

    <asp:Table runat="server" CssClass="defaultTable" />
    <asp:Table runat="server" CssClass="nonDefaultTable" SkinId="nonDefaultSkin" />

Now it might be making more sense. Once I added the SkinId tag to the skin file, this allowed me to have the same control take on two different classes. Now, you can only have one default (The first one as it doesn’t have the SkinId tag) and any others for the same control have to use the SkinId tag.

Now go back to the two tables and once again you’ll see there is one with a SkinId tag and one without. The one without will take the default look and the one with will take the named look. Pretty simple, right? Well we’re not completely done yet. Two more small steps:

Be sure to remember to link the style sheet on the page with the tables:

    <link href="../CSS/SkinMe.css" type="text/css" rel="stylesheet" />

And you have find the “pages” section of the web.config and add a tag:

    <pages styleSheetTheme="Basic">

And now you have the ability to set every table’s class in the entire site. Best thing is, this can be used for other properties too. Say you have a name property on some usercontrol (We’ll call it MapControl). You can do this:

    <%@ Register Assembly="Some.Control.Assembly" Namespace="Some.Control.Assembly.Controls" TagPrefix="someControl" %>

    <someControl:MapControl Name="Hi" />

And now every MapControl will have the Name property set to “hi”. Kind of nice.

UpdatePanel and UserControl Events

So on the funnest programmin’ site evar someone had asked how to allow an UpdatePanel on a page handle an event of a UserControl. So here’s the situation:

Let’s say you have a UserControl and on that UserControl you have a DropDownList. I know, this is getting complex, but just bare with me. Now imagine, if you will, you want the Parent page’s UpdatePanel to trigger off of the mentioned DropDownList. As it stands, this isn’t going to happen. Why? Because the Parent really can’t capture the event firing on the control since it is localized to the UserControl. What to do? Easy, just pass the event on.

    public partial class CatchMyEvent : UserControl
    {
        public delegate void ChangedIndex(object sender, EventArgs e);
        public event ChangedIndex SelectedIndexChanged;

        protected override void OnInit(EventArgs e)
        {
            base.OnInit(e);
            dropDownListThrow.SelectedIndexChanged +=
               new EventHandler(dropDownListThrow_SelectedIndexChanged);
        }

        protected override void OnLoad(EventArgs e)
        {
            base.OnLoad(e);
        }

        public void dropDownListThrow_SelectedIndexChanged(object sender, EventArgs e)
        {
            if(SelectedIndexChanged != null)
            {
                SelectedIndexChanged(sender, e);
            }
        }
    }

As you can see, all I’ve done

  1. Created a PUBLIC delegate and event that has the same signature as the SelectedIndexChanged event
  2. Captured the SelectedIndexChanged event in the UserControl
  3. Fired off the created event

It’s like I’m just handing off the event firing to the next guy, the next guy being the Parent page in this instance. Now the code behind for the Parent page is really simple:

    public partial class Catcher : Page
    {
        protected override void OnInit(EventArgs e)
        {
            base.OnInit(e);
            catchMyEventMain.SelectedIndexChanged += dropDownListThrow_SelectedIndexChanged;
        }

        public void dropDownListThrow_SelectedIndexChanged(object sender, EventArgs e)
        {
            labelSelectedValue.Text = ((DropDownList)sender).SelectedItem.Text;
        }
    }

As you can see, the Parent now is also looking for the DropDownList SelectedIndexChanged event to fire, except we both know that it’s not the official SelectedIndexChanged event, but an event that is merely passing on the information. Now for the Parent page markup:

    <asp:ScriptManager ID="smMain" runat="server" />
    <asp:UpdatePanel ID="upMain" runat="server" >
        <Triggers>
            <asp:AsyncPostBackTrigger ControlID="catchMyEventMain" EventName="SelectedIndexChanged" />
        </Triggers>
        <ContentTemplate>
            <uc1:CatchMyEvent ID="catchMyEventMain" runat="server" />
            <asp:Label ID="labelSelectedValue" runat="server" />
         </ContentTemplate>
    </asp:UpdatePanel>

So in all this will update a label’s text on the Parent page to equal that of the SelectedItem.Value of the DropDownList of the UserControl. And all without the annoying page refresh.

Just remember, the DropDownList has to have AutoPostback set to true. Don’t be dumb like me and forget that when testing.

You can do that in Javascript: Dynamically Create Divs

Creating divs on the fly and assigning methods:

As I have been working with Script Controls lately, I’ve been forces to learn more about javascript…. yeah I know, bleh. However, in my learnin’ I’ve actually been forced to like Javascript…. yeah I know, bleh.

Well one this I was doing was tranfering a front end control to a Script Control. Basically I am building an Auto Complete control that is using the Ajax.dll AjaxMethod stuff. Thus skipping the need for web services that the Ajax Control AutoComplete needs. Anyhow, the reason I am saying this is that it gets a list of Users and dynamically creates a list of divs that change color when hovered over and fill in a textbox when selected. Originally I was doing this by creating the html needed, then appending the innerHTML property on the container div.

function buildSelectableDiv(currentCount, innerText, textboxName, parentDiv)
{
   var defaultClass;
   var divChild;
   var divToAdd;
   var picker;

   //create the parent div
   divToAdd = document.createElement('div');
   //set the id of the div
   divToAdd.setAttribute('name', 'divNames' + currentCount);

   //Create child div
   divChild = document.createElement('div');
   //getting the child ready
   divChild.setAttribute('name', 'divNamesChild' + currentCount);

   //Add child to new parent
   divToAdd.appendChild(divChild);

   return divToAdd;
}

And there you go. Creating a div and adding div to it.