FSharp: Using the Pipe Operartor to Chain Methods

This is a real quick and simple thing, so uh yeah… One of the things I detest in F# is having to use the “normal” method chaining built into C#. FOr instance with the StringBuilder class:

open System.Text

let something =
    StringBuilder()
      .Append("hi")
      .Append("there")
      .Append("!")
      .ToString()

Now for C# that is acceptable.. but not for F# when the |> operator is involved. I want this:

let something =
  StringBuilder()
    |> Append "Hi" 
    |> Append "There"
    |> Append "!" 
    |> ToString()

Which is actually a lot easier than it might seem. When using the |> the next method has to take in the last method’s result. As long as the last parameter of the method matches up with the result of the last, you’re gold. This will NOT work:

let something =
  StringBuilder()
    |> Append "Hi" 

There’s no StringBuilder to be used for that Append method, so it breaks. Remember, the last parameter of the next method has to be the same as the preceding result. So…:

  let append (text: string) (builder : StringBuilder) =
    builder.Append(text)

  let toString (builder : StringBuilder) =
    builder.ToString()

As you can see, the appendBuiler method has a signature of StringBuilder -> string -> StringBuilder meaning it takes in a string and then a StringBuilder. Now because of currying, this is complete viable:

  appendBuidler "Hi" ?

Where the ? will be filled in at some point. All it knows is that the ? will be a StringBuilder. With this in mind, the chain kind of looks like this:

  StringBuilder() |> append "Hi" ? |> append "There" ? |> append "!" ? |> toString ?

Where every ? is a place holder for the result of the previous method.

Does this save any time? Eh probably not. However, it does show the how useful the |> can be when it comes to workflow like design. For example:

  database |> openAConnection |> getAllUserNames |> closeTheConnection |> Seq.length > 0 |> shouldBeTrue

See if you can figure that one out.
Getting Started with Nuget and Visual Studios 2012… or whatever it’s called now.

So if you’re like me, and I’m guessing you are since you are reading this, you have a sort of idiotic reaction to anything that takes setting up. This may have prevented you from using anything on linux, setting the clock in your car, and using Nuget. Now up until this point I have tried really hard to avoid Nuget due to its… unfortunate earlier life. However, this wasn’t due to the concept, but more of the completely insane mass assembly hoarding functionality that made it about as useful as … something that isn’t useful. Sorry, couldn’t come up with anything funny. Surprised, I’m sure.

So anyways, after about two hours of pure pain this afternoon, I got it to work. And it works LIKE IT SHOULD HAVE THIS WHOLE @#@!ING TIME.

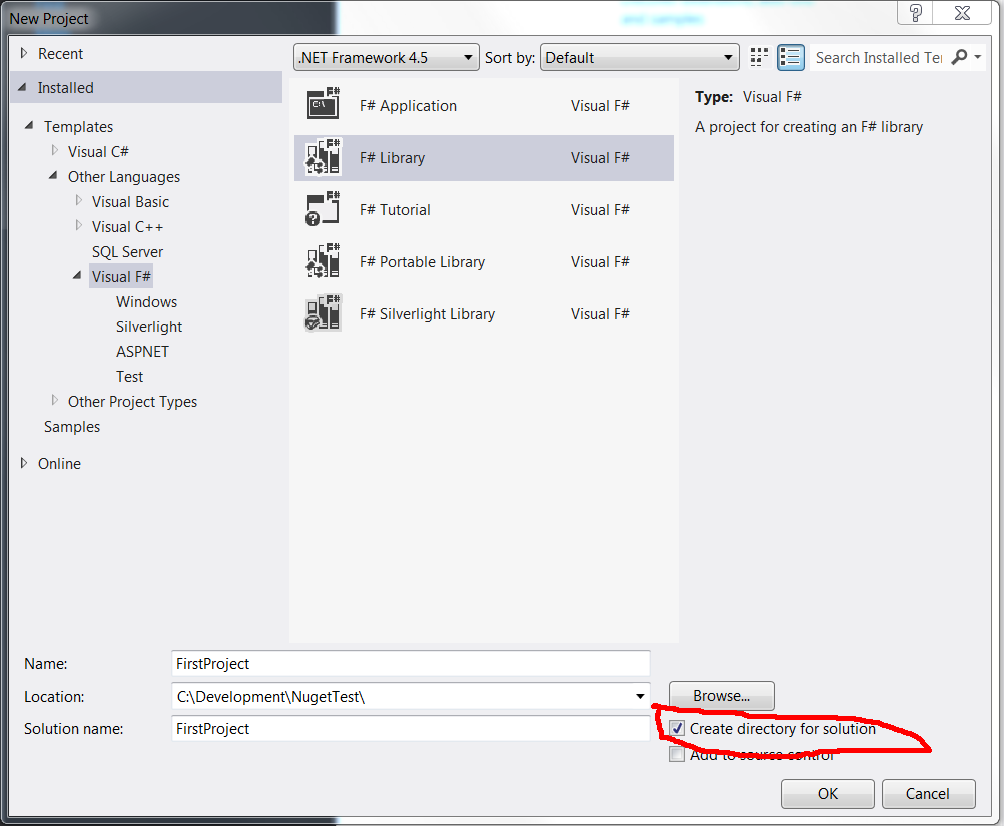
Ok first step is to just create a project. Excitement! One thing to make sure, or at least for this random mass of pointless I call a tutorial, that you have the “Create directory for solution.” checked.

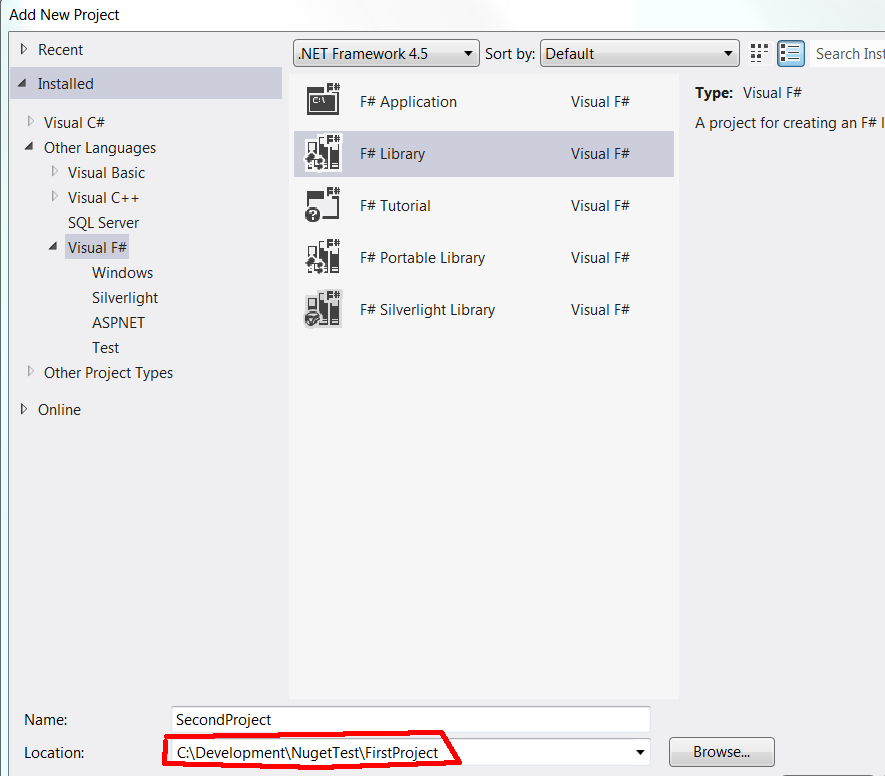
Next is to create a second project. Yeah I know you weren’t ready for something as complicated as a solution with two projects, but that really doesn’t concern me.


One note is that to make life easier make sure both projects are on the same level of the solution folder hierarchy thing… hence the awesome red trapezoid-ish thing in the picture.

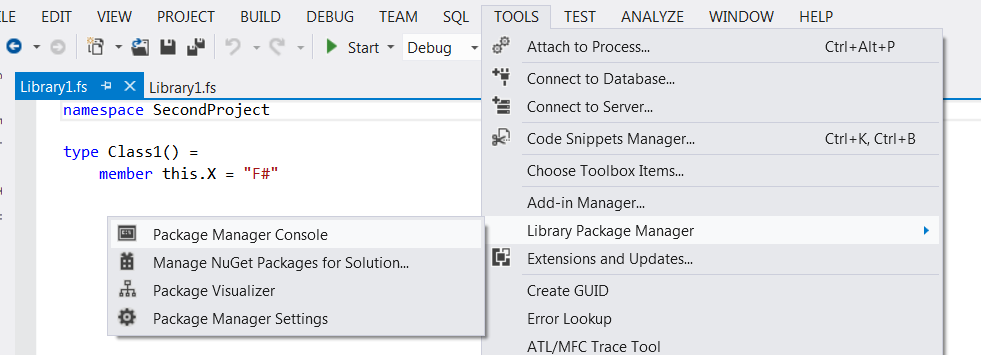
Next up is opening up the package manager that is nestled so comfortably in TOOLS -> Library Package Manager -> Package Manager Console:

This is basically a nifty command line like tool for Nuget which I personally prefer.

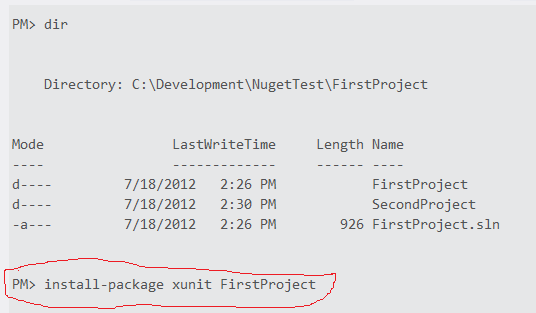
For the first project I added… waiting for Paint to open my awesome png that apparently is so awesome it is causing paint to freeze up. That’s right folk, freezing Paint is the true test of awesome. It’s that or Gimp is jealous that I used Paint. Not sure. Anyways, for the first project I added xunit.

Something of note is that the name of the project you are installing something too is known by the Package Manager Console. Really nice feature to assist with selecting the right project.

For the second project I added FsUnit.xunit… And somehow the image I just loaded into Gimp was almost instantaneous. Funny how that is.

Yippee. When you go to the directory through Windows Explorer you’ll notice the top level folder now has a packages folder.

This will be the folder all projects will refer to so you don’t have 20 different copies of Nunit for the 20 unit testing projects you have. Now if you go one step into FirstProject you’ll see that a packages.config file has been added. It is just a file that tells Nuget what packages (Assemblies) the project needs in the packages folder.

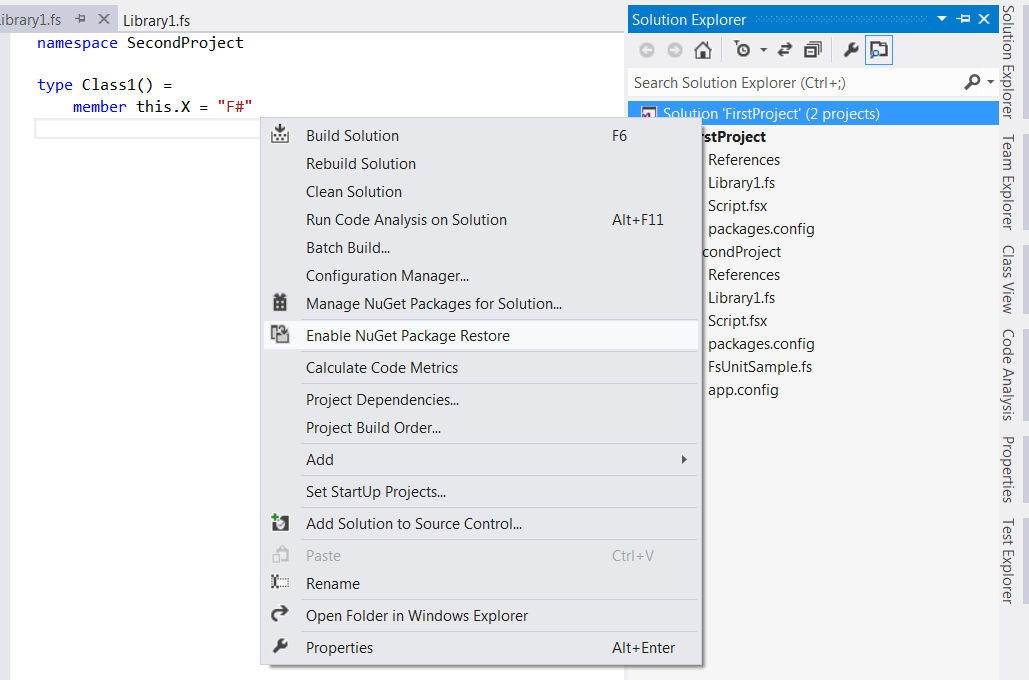
Almost done. The one last thing that is actually pretty nice is having Nuget/Visual Studio get all needed packages that are missing on Build. Right click the Solution item in the Solution Explorer -> Enable Nuget Package Restore

So now what you can do is close the solution, delete that top level packages folder, reopen the solution, build, and see that the top level packages folder has been recreated. This is a really nice feature that can help with sending a solution to source control, and not have to take the outside assemblies with it.

So there you go… Seriously that’s all I’ve got. Go home.