Quick Example of Inheritance in Templates with Mako: Using Next

So as I further my side journey into Python, or Pylons to be more exact, one of the decent things I’ve run into is that Mako templating system. What is that? It’s what runs along side of Pylons (Or at least one of many) for displaying the View side of the whole MVC thing. Now if you’re here, chances are you just searched on this so I wouldn’t go into a huge thing about Pylons or Mako. I’ll just get to the damn point.

This is just an example of a three layer template I use to help with pumping out pages with out repeating a lot of code. The nice thing about Mako is how simple it is to have multiple layers of templates to make up a single page. This is basically done with using the next keyword.

What is next?
Mako has a system that works something like an abstract class. A page template can define a certain area in a method like way and like an abstract method, there is no method body. Any page template that “inherits” the base has to fill in the body or create an abstract method itself to call the original method.

Now with that being said, there are two key words for doing this and the default keyword is self. Problem with self is that it looks at the top most template only. So if you have say 3 layers:

BasePage -> SecondLayer -> ThirdLayer

self will always look to the third layer:

BasePage -> ThirdLayer

While second layer is all like, “Yeah whateve”. Overall, this isn’t very helpful if you want a sort of chain like effect. Its basically like a base class not giving a flying… not caring about what any child classes do except the top most child class. What if you have a div that holds content on the base, and the second layer has its own content area to hold the third layer. This would be useless if you used self since that second layer would just be ignored. Sad day. This is where next comes in. Next, like an abstract method, basically just sets a place holder for the next template to “inherit” the said template. Now the danger of next is that just like an abstract method, the system will be all “Waaaaaah, you didn’t override the method. Waaaaaah.” if you forget to define the method in the next layer. The huge advantage is you can create a nice consistent design in which you can just bang out child templates since you know exactly what the baser (Yeah I wrote baser.) page will have.

On to the example. And this is an example of what a template structure could look like.

The base page:

  <html>
    <head>
       //next.title will allow all children to add on to the title
       <title>First Level - ${next.title()} </title>

        //next.styleSheetIncludes will allow all children to add any included css files if needed.
        <link rel="Stylesheet" href="${h.url('/css/base.css')}" />
        ${next.styleSheetIncludes()} 

        //next.javascriptIncludes will allow all children to add any included javascript files if needed.
        <script type="text/javascript" src="${h.url('/scripts/base.js')}"></script>
        ${next.javascriptIncludes()} 

        //next.styleSheet allow all children to add any page specific css that wasn't included in files.  Why
        //  have the style tags instead of just having the  ${next.styleSheet()}.  Well you could but then you would
        //  end up with more than one style tag when the page is built.
        <style type="text/css">
          ${next.styleSheet()}
        </style>

        //next.javascript allows all children to add any page specific javascript that wasn't included in files. This
        //  follow the same idea as the next.styleSheet above.  Why have a possible 3...4...5... script tag when
        //  the child templates can just add to this one?
        <script type="text/javascript">

          function firstLevel(){
          }

          ${next.javascript()} 

          //next.javascript allows all children to add any page jquery document.ready javascript that is specific to the
          //  given child.  Once again this is an example of add to instead of repeating a section
          jQuery(document).ready(
            function () {
              jQuery('button').button();

              ${next.documentReady()} 

            }
          );
        </script>
    </head>
    <body>
      <div class="header">
      </div>
        <div class="bodyContainer">
          //This will be where the child html will fall.
          ${next.body()}
        </div>
      </div>
   </body>
  </html>

The second layer:

  <%inherit file="base.html" />

  <%def name="title()">
    - Second Level
  </%def>

  <%def name="styleSheetIncludes()">
    <link rel="Stylesheet" href="${h.url('/css/secondLevel.css')}" />
    ${next.styleSheetIncludes}
  </%def>

  <%def name="styleSheet()">
    ${next.styleSheet()}
  </%def>

  <%def name="javascriptIncludes()">
    <script type="text/javascript" src="${h.url('/scripts/secondLevel.js')}"></script>

    ${next.javascriptIncludes()}
  </%def>

  <%def name="javascript()">
    function secondLevel(){
      //Method in second level
    }
    ${next.javascript()}
  </%def>

  <%def name="documentReady()">
    //nothing here on second level
    ${next.documentReady()}
  </%def>

  <%def name="body()">
    <div class="leftMenu">
      <a href="something.html">something</a>
      <a href="somethingElse.html">something else</a>
    </div>
    <div class="rightArea">
      ${next.body()}
    </div>
  </%def>

As you can see, all the abstract areas defined in the base are being used by this layer and then this layer is in turn adding its own abstract methods that share the same name as the base template’s method. The nice this is you can do this using the next keyword as the current template will only respond to the template immediately inheriting it. You don’t get any kind of method name clash.

And the final layer:

  <%inherit file="secondLevel.html" />

  <%def name="title()">
     - Third Level
  </%def>

  <%def name="styleSheetIncludes()">
    <link rel="Stylesheet" href="${h.url('/css/thirdLevel.css')}" />
  </%def>

  <%def name="styleSheet()">
    .thirdLevel
    {
    }
  </%def>

  <%def name="javascriptIncludes()">
    <script type="text/javascript" src="${h.url('/scripts/thirdLevel.js')}"></script>
  </%def>

  <%def name="javascript()">
    function thirdLevel(){
      //Method in second level
    }
  </%def>

  <%def name="documentReady()">
    //nothing here on third level
  </%def>

  <%def name="body()">
    <div> Hi from third level</div>
  </%def>

The third layer now closes off the chain by no longer adding any abstract methods of its own. Now if I knew there could be yet another layer, all I would have to do is use the same naming convention and add the needed next.methods.

And this is what the source should look like:

  <html>
    <head>
      <title>First Level - - Second Level - Third Level </title>

      <link rel="Stylesheet" href="${h.url('/css/base.css')}" />
      <link rel="Stylesheet" href="${h.url('/css/secondLevel.css')}" />
      <link rel="Stylesheet" href="${h.url('/css/thirdLevel.css')}" />

      <style type="text/css">

      .thirdLevel
      {
      }

      </style>

      <script type="text/javascript" src="${h.url('/scripts/base.js')}"></script>
      <script type="text/javascript" src="${h.url('/scripts/secondLevel.js')}"></script>
      <script type="text/javascript" src="${h.url('/scripts/thirdLevel.js')}"></script>

      <script type="text/javascript">

        function firstLevel(){
        }

        function secondLevel(){
          //Method in second level
        }

        function thirdLevel(){
          //Method in second level
        }

        jQuery(document).ready(
          function () {
            jQuery('button').button();
	      //nothing here on second level
              //nothing here on third level
          });
        </script>
    </head>
    <body>
      <div class="header">
      </div>
      <div class="bodyContainer">
        <div class="leftMenu">
          <a href="something.html">something</a>
          <a href="somethingElse.html">something else</a>
        </div>
        <div class="rightArea">
          <div> Hi from third level</div>
        </div>
      </div>
    </div>
   </body>
  </html>

As you can see, things like the ${next.documentReady()} really helped to keep the source code clean and avoid repeated code on the source side. Now go forth, all 2 of you… including me…, and use this knowledge to do something.

Pylons: ‘module’ object has no attribute ‘redirect_to’

Yeah I’m using python/pylons, don’t you worry about it.

So ran into this while looking over a pylons tutorial.  Turns out, that method was removed in Pylons 1.0 but the tutorial was a little bit old. So instead of:

  redirect_to(controller='hello', action='other_action', _code=303)

just use:

  from pylons import url
  from pylons.controllers.util import abort, redirect

  ...

  redirect(url(controller='hello', action='index', _code='303'))

Bad news is I didn’t get a chance to actually see the full behavior of the old redirect to, so I’m not sure the result:

  http://127.0.0.1:5000/?_code=303

Is the same. Still new to this thing called pylons. Just got annoyed trying to find an answer to this one so hopefully my title will speed up the search for future people.

Connect Your Web App To Twitter Using Hammock & C-Sharp

The Challenge

Hammock LogoRecently I was challenged with the task of connecting a web application to Twitter and sending out a tweet. This article will focus on the connection to Twitter, saving the talk about sending out a tweet for another article.  Having used TweetSharp last year, I thought I would check for an updated version of it and be on my way.  When I got to CodePlex, I learned that support for TweetSharp had pretty much stopped in May and the developers had moved onto Hammock.

After reading their explanation, and suggestions for future development, I decided to use Hammock to connect my web application to Twitter.  What is Hammock you ask, in their own words, it is a REST library for .NET that greatly simplifies consuming and wrapping RESTful services.  In plain English, it makes integrating REST APIs a snap.  If you want an explanation of what REST is, please check out Wikipedia.

I have to give credit to ColinM, author of this forum post on CodePlex, for giving me the basis of this code.

Before The Code

Before you can connect your web application (or desktop application) to Twitter, you need to register with Twitter.  This is not the same as creating a new Twitter account, which you will need, instead this is telling Twitter that your application is going to want to interact with it.  To do this, go to http://twitter.com/apps/new.

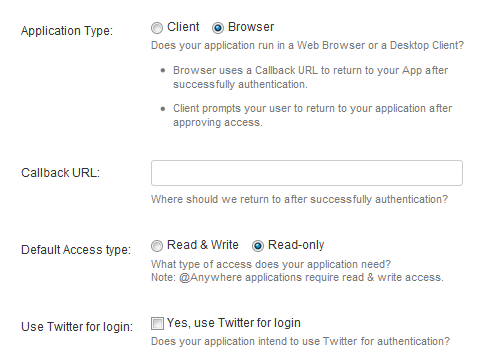
Adding A New Twitter App

Let’s talk about some of the settings you will need to configure when you register your application.

  • Application Type – For this example, choose Browser (Web).  If you choose Client (Desktop), you will see the Callback URL option go away.
  • Callback URL – This is the URL Twitter will send your users to after they Allow or Deny your request to connect your application to Twitter.  I would recommend entering this as your production URL.  In this article I will show you how to override this setting in your code.
  • Default Access type – If your application is only going to consume data from Twitter, you can leave it at Read-only, but if you intend on posting tweets you will need to select Read & Write
  • Use Twitter for login – If you want to allow users to authenticate via Twitter, check this box.

After you register your application, Twitter will give you the information you need to connect.  You will need to take note of your Consumer key and Consumer secret.  This key/secret combination is unique to your application.  The Request token URL, Access token URL and Authorize URL are the same for pretty much everyone.  Now that we’ve established your secret identity with Twitter, we can get started.

A Four Step Process

To make my example as simple as can be, I broke it down into four steps.  Also, I set up this example using two web forms.  Steps One and Two are called from GetTwitterRequest.aspx and Steps Three and Four are called from ProcessTwitterResponse.aspx.  You can do this from the same form if you wish.  If you’re not into web forms, you can call it from an ASP.NET MVC View as well.

For simplicity, I have setup a couple of private strings called CONSUMER_KEY & CONSUMER_SECRET.  Yeah, you guessed it, those are the values we needed from Twitter.  You can store these in a database, in your web.config, or hard code them right in your C# code, that’s all up to you.

For the purpose of making a fast, lightweight example, I used Session to store certain information.  You will probably want to store the  accessKey and accessSecret in a database.  You will want to associate these values with your user in your system.  We will talk about each key later on.

Here are the related “usings”:

using System.Net;

using Hammock;
using Hammock.Authentication.OAuth;
using Hammock.Web;

Also, many developers have found the need to include the following line of code when talking to Twitter. I can’t explain why.

ServicePointManager.Expect100Continue = false;

Step One: Identify Your Application

var credentials = new OAuthCredentials
{
	Type = OAuthType.RequestToken,
	SignatureMethod = OAuthSignatureMethod.HmacSha1,
	ParameterHandling = OAuthParameterHandling.HttpAuthorizationHeader,
	ConsumerKey = CONSUMER_KEY,
	ConsumerSecret = CONSUMER_SECRET,
	CallbackUrl = "YOUR_CALLBACK_URL_GOES_HERE/ProcessTwitterResponse.aspx",
};

var client = new RestClient
{
	Authority = "http://twitter.com/oauth",
	Credentials = credentials
};

var request = new RestRequest
{
	Path = "/request_token"
};

RestResponse response = client.Request(request);

Before you can connect your application with Twitter, you need your application to identify itself.  Above you will find a pretty standard piece of code that you can use to do that.  You won’t have to change much of this code to get it working with your application.

First, you need to instantiate your credentials.  To do this, you’ll need to provide your CONSUMER_KEY, CONSUMER_SECRET, and Callback URL. Use your key/secret combination provided by Twitter. Your Callback URL is the URL of the page you want to process the response from Twitter.  As a note, Twitter only supports hmac-sha1 signatures.  After you’ve created your credentials, you’ll need to instantiate a RestClient and RestRequest.

In short, the RestClient uses your Credentials to execute your RestRequest.  When you execute your RestRequest you will need to capture the RestResponse for use in Step Two.

Step Two: Ask For Permission To Connect

var collection = HttpUtility.ParseQueryString(response.Content);
Session["requestSecret"] = collection[1];
Response.Redirect("http://twitter.com/oauth/authorize?oauth_token=" + collection[0]);

In step two, we are going to parse the RestResponse from our RestRequest in Step One.  If Twitter recognizes your application, you will receive a temporary key/secret combination that we’ll call requestKey and requestSecret. This key/secret combination will be used to request authorization to connect your application to your user’s Twitter account.  It is important to note that this combination is good for one request.  Once you use them, you’ll have to get a new requestKey and requestSecret to make new authorization requests.

I used HttpUtility.ParseQueryString to break apart the querystring in the RestResponse.  The first part is going to be your requestKey, and the second part is your requestSecret.  To actually make the request, you are going to send your requestKey back to Twitter.  You will want to store your requestSecret for use in Step Three.  For this example I stored the requestSecret in Session.  You can store this in a database if you want, but due to it’s temporary nature, storing it in Session or a Cookie should work just as well.

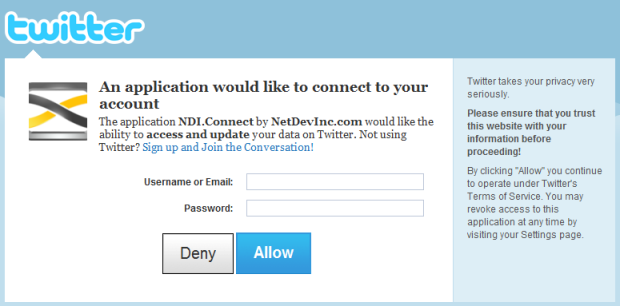
When you redirect your user to Twitter for authorization to connect your app to their Twitter account, they should see a screen similar to the one below.

Create A Twitter Connection - Deny or Allow

Step Three: Wait For Twitter’s Response

var requestToken = (String)Request.QueryString["oauth_token"];
var requestSecret = (String)Session["requestSecret"];
var requestVerifier = (String)Request.QueryString["oauth_verifier"];

var credentials2 = new OAuthCredentials
{
	Type = OAuthType.AccessToken,
	SignatureMethod = OAuthSignatureMethod.HmacSha1,
	ParameterHandling = OAuthParameterHandling.HttpAuthorizationHeader,
	ConsumerKey = CONSUMER_KEY,
	ConsumerSecret = CONSUMER_SECRET,
	Token = requestToken,
	TokenSecret = requestSecret,
	Verifier = requestVerifier
};

var client2 = new RestClient()
{
	Authority = "http://twitter.com/oauth",
	Credentials = credentials2
};

var request2 = new RestRequest
{
	Path = "/access_token"
};

RestResponse response2 = client2.Request(request2);

At this point, your application will be waiting for Twiiter to send back a response. It will do so by redirecting the user to the URL you sent Twitter in Step Two. This step is very similar to Step One, with the exception that we will be sending more data. Besides your CONSUMER_KEY and CONSUMER_SECRET, you will need to provide your requestToken and requestVerifier, which you get from Twitter’s call to your Callback URL. You will also need your requestSecret which you stored in Step Two.

Again you will use a RestClient to execute your RestRequest.  When you execute your RestRequest you will need to capture the RestResponse for use in Step Four.

Step Four: Remember Your Secret Handshake

Now all we need to do is parse the response from Twitter and save the token and secret they return.

var accessResponseCollection = HttpUtility.ParseQueryString(response2.Content);

Session["accessToken"] = accessResponseCollection["oauth_token"];
Session["accessSecret"] = accessResponseCollection["oauth_token_secret"];

Twitter will respond, if the user allowed the connection, with a permanent accessToken and accessSecret. This IS your secret handshake with Twitter. You will want to store the accessToken and accessSecret in your database.  I know I stored it in Session, but that’s because I was too lazy to wire this example to a database.  Using you accessToken and accessSecret in future Twitter API calls is how you connect to your user’s Twitter account to your application. This token and token secret do not expire unless the user removes the connection to your application via the Twitter web site.

In closing, all this article really does is help you connect with Twitter, you will have to find something to do with this connection.  It should also give you a light understanding of REST API calls as well as some insight on the OAuth authentication process.  There will be future articles to help you tweet from your application or get data from Twitter to display.


To find out more about the technologies in this article, check out the following links.

Hammock – http://hammock.codeplex.com/

OAuth – http://oauth.net/

Twitter API – http://apiwiki.twitter.com/

WPF: Inherit Style From Style. BasedOn Is Your Friend

So another quick one.  Say you have a style for creating round buttons, but you don’t want to include a size, how a size be applied without touching the original style?  Well you could just adjust the properties right on the button, but what if you want something a little more reusable?  It’s actually pretty simple, just have one style “inherit” the other.  Well that’s where BasedOn comes in.

Say you have a style named RoundButton.

    <Style x:Key="GlassButton" TargetType="{x:Type Button}">
      ...
    </Style>

All you have to do is create a new style:

    <Style x:Key="HeaderButton" BasedOn="{StaticResource GlassButton}" TargetType="{x:Type Button}">
        <Setter Property="Height" Value="20" />
        <Setter Property="Width" Value="20" />
    </Style>

As you can see, it’s pretty simple using the BasedOn keyword. Now when the HeaderButton style is applied to the button, it will take on the properties of the RoundButton style and the HeaderButton one. Nice huh?

WPF: Hide Built in Header Bar For an Open Window

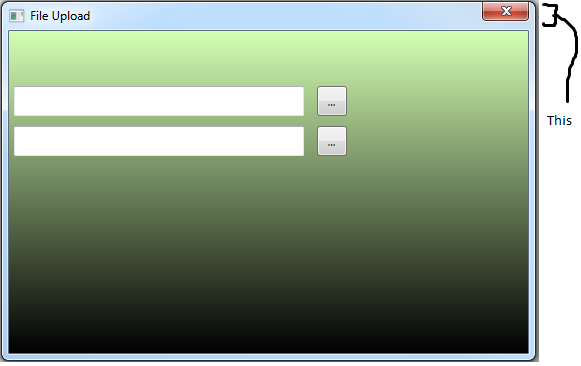
Ok so this one is a simple one.  Well at least once you see it in action.  Say you want to get rid of the built in windows header bar:


You know, that thing. Well it’s crazy simple. And I mean crazy as in mind boggling, not crazy like dress up your cat in clothes crazy.

All you have to do is set these two properties:

AllowsTransparency="True" WindowStyle="None"

In the window tag at the top of the page. For example:

<Window x:Class="DesCombine.WPF.FileUpload"
  xmlns="http://schemas.microsoft.com/winfx/2006/xaml/presentation"
  xmlns:x="http://schemas.microsoft.com/winfx/2006/xaml"
  Title="File Upload" Height="350" Width="525" BorderThickness="0" ResizeMode="NoResize"
  WindowStartupLocation="CenterScreen" AllowsTransparency="True" WindowStyle="None">

Only catch is that you have to now supply any useful buttons like Minimize or Close by yourself. But I never said that you wouldn’t. You thought that. You.

Spark View Engine, ASP.Net MVC, and You

So one of the things I was forced to use, semi kicking and screaming, at one point in my illustrious career was the Spark View Engine for ASP.Net MVC. Actually that’s not totally true. I only kicked for a bit then skipped the screaming once I noticed what it did: It took all the ugly <% %> junk out of the html… my beautiful html… and made things like for loops much nicer. Mind you, this is mererly the tip of the ice pick… eh berg I meant berg… there’s a lot more to it. It handles things like Master Pages and Partial Controls pretty darn well as well as caching javascript files on the go. Sounds good? Well it should and if it doesn’t, I don’t think we can be friends.

First off, I just wanted to quickly write something up on how to get it all going and because I’m such a nice guy I even have a project that is ready to go for common use. The catch is that I made it in 2010 so if you don’t have that yet, you could be screwed. Then again I could type out a lot of the steps too. You just don’t know.

First off you can either get the assemblies from my hosted project, or you can go here and get it. Either way, I don’t care. No really, I don’t. Not just sayin’. The care cup had run dry.

The two assemblies you need to reference in your project are:

  spark.dll
  spark.mvc

Next add this line to the Application_Start method in the Global.asax.cs file:

  ViewEngines.Engines.Add(new SparkViewFactory());

After that, you’ll have to add a little somethin’ somethin’ to your web.config. I know, I know. This is all so very hard. Live strong like Lance.

  <configuration>
    ...
    <configSections>
      <section name="spark" type="Spark.Configuration.SparkSectionHandler, Spark"/>
    </configSections>
    ...
    <spark>
      <compilation debug="true" defaultLanguage="CSharp">
        <assemblies>
          <add assembly="PhotoShare.UI" /> //Whatever the actual UI project is
        </assemblies>
      </compilation>
      <pages automaticEncoding="false"> //If you want it to auto HTML encode post/get stuff
        <namespaces>
          <add namespace="System"/>
          <add namespace="System.Collections.Generic"/>
          <add namespace="System.Linq"/>
          <add namespace="System.Web.Mvc"/>
        </namespaces>
      </pages>
    </spark>

Ok so the web config is ready. Now what?

Well now you are going to create a master page. That’s right you are. Don’t fight me on this. I’m way cooler than you.

There is a little directory structure hard coding going on since by default you have to have things in certain places for Spark. Oh well. All Master Pages go in a directory named “Layouts” in the “Views” directory. So something like:

  Views/Layouts/Application.spark

D— it. Forgot about that little tid bit too. Spark files have to be named .spark. Well actually I think there’s a way to call them whatever you want, but lets just go with defaults for now smarty pants.

And for the hard part, the html for the master page.

  <html>
    <head>
    </head>
    <body>
      <div>
        <use content="Middle" />
          aasdfasdfa
      </div>
    </body>
  </html>

HOLY HECK THAT’S HARD! Now there needs to be a controller. So just create one in the controllers folder. In my project it’s called this:

  Controllers/SparkTestController.cs

And then go ahead and create a view for index. Once you’ve done that, rename the extension from aspx to spark. Now for the html:

  <use master="Application"/>

  <div>
    <content name="Middle">
        hi there
    </content>
  </div>

And that’s it really. As you can see, the placeholder on the master page (use content=”Middle”) is referred to on the child page.

To make testing this page easy, I would suggest changing the routing in the Global.asax.cs file to:

  routes.MapRoute(
          "Default",
          "{controller}/{action}",
          new { controller = "SparkTest", action = "Index"}

And you should see something like:

  hi there aasdfasdfa

Proving that both the master page and the child page are printing stuff out.

You might be wondering why you should do all of this? If you aren’t, you are one hell of a lemming. And not the cool kind like those little guys that blow themselves up for the betterment of the lemming collective.  You’re that stupid one the just sits there with its hand out shaking its head.

A quick example:

  <%
    if(something.IsTrue)
    {
  %>
       <div> hihihihih </div>
  <%
    }
  %>

Compared to:

  <div if="something.IsTrue"> hihihihih </div>

Small example, but I think its pretty obvious why the second is so much better. And this is just scratching the surface on what spark does really.  I’d suggest looking here for more. I’d also suggest a new hair cut because… just wow.

ByATool.com Is Looking For Writers

Yeah, you read that right.  ByATool.com is looking to add one or two writers with various IT backgrounds.  This is not a job, it is simply an avenue for you to get your work read.  We want to know what YOU want to write about.  It’s no fun to be given a topic to write about when your passion lies elsewhere. Please contact us at the address listed below so we can discuss this one-on-one!
What we need from you:
Name:
E-Mail:
What would you like to write about:
How often would you like to write:

Please submit this simple information, along with an example blog post to iwanttowrite [at] byatool [dot] com

New SharePoint Server Explorer in Visual Studio 2010

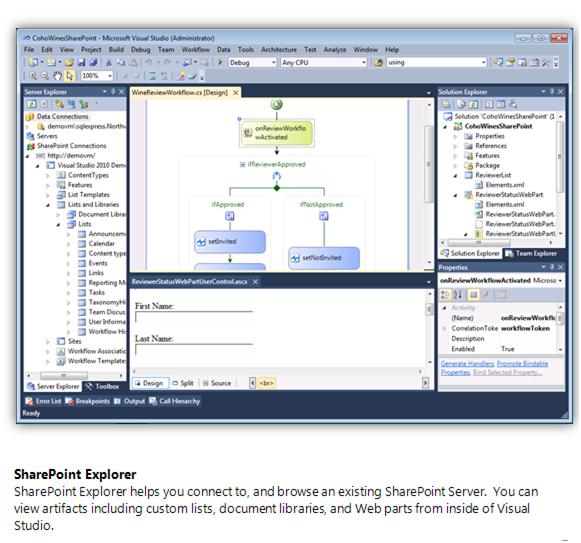
Just kinda geeking out about this, but when looking over some of the new features for Visual Studio 2010  I caught this little gem in the white paper….

You see that?…. IT’s A SHAREPOINT SITE IN THE SERVER EXPLORER!! 

<Rubs hands together gleefully> Now… to figure out how to fit playing with this in after all my other urgent priorities….

MVC and Table Inheritance: Part 1

PART 1:  Setting up the database and Entity Framework Model

Okay, so say you need to create an internal IIS hosted web application that acts as a portal for managing internal training courses.  You could do a simple ASP.NET web forms app…. but what’s the fun in that?!?  Besides, you know that you’re going to need to expand this thing regularly to handle different course types and provide different layers of permission depending on the user.  Well, as it happens, ASP.NET MVC is a really nice way to address such a situation (especially if you’re already familiar with using Java and Struts).

Before we get started you’ll need to get the usual downloads from Microsoft found here:  http://www.asp.net/mvc/

Create ASP.NET MVC Project

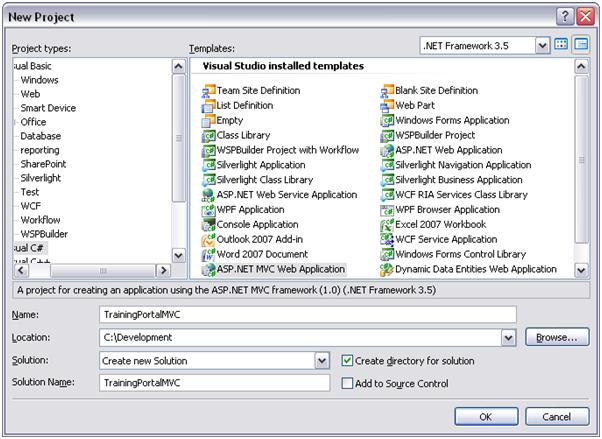
Then you’ll need to open either Visual Studio 2008 or the free Visual Web Developer 2008 Express and select the File->New Project menu item.  This will bring up the “New Project” dialog.  To create a new ASP.NET MVC application, we’ll select the “Web” node on the left-hand side of the dialog and then choose the ASP.NET MVC Web Application template and enter the following:

  • Name: TrainingPortalMVC
  • Location: C:\Development
  • Solution: Create new Solution
  • Solution Name: TrainingPortalMVC
  • Create directory for solution:  checked

SQL 2005 Database Tables

To setup your MVC project so it can use the Microsoft Entity Framework:

  1. Right-click the App_Data folder in the Solution Explorer window and select the menu option Add, New Item.
  2. From the Add New Item dialog box, select SQL Server Database, give the database the name TrainingPortalDB.mdf, and click the Add button.
  3. Double-click the TrainingPortalDB.mdf file to open the Server Explorer/Database Explorer window.
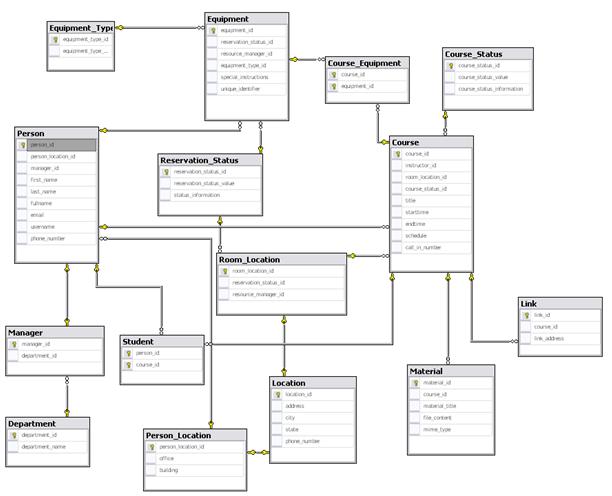
  4. Click on the Database Diagrams folder and say yes to create a new diagram
  5. Setup your tables to look like this:

Create the Entity Framework Model

Steps

  1. Right-click the TrainingPortalMVC project.
  2. Select in the menu Add New Item
  3. Select from the Templates: ADO.NET Entity Data Model
  4. Enter the name TrainingPortalEDM.edmx then click Add
  5. Choose the Generate from database then click Next>
  6. For the data connection, select TrainingMvc.mdf make sure the checkbox is checked and the connection settings is TrainingMvcEntities then click Next>
  7. Check all tables in the database except for the sysdiagrams (dbo) one and make sure the Model Namespace is TrainingMvcModel.  Click Finish

Suggested Modifications

  • Open the ModelBrowser panel in Visual Studio 2008, and expand the EntityContainer->EntitySets and add “Set” to the end of your Entity Sets….. Trust me, it will make things much less confusing later…

When you’re done you should have something like this:

This is the end of Part 1…… Calm down, I know you can’t possibly wait for more answers, but a girl’s gotta have a little mystery to keep things interesting.  Good luck and hopefully this will help you shed another angle of light to get a better idea of how you want to approach this type of application until I can finish procrastinating…. I mean preparing Part 2…..

Failure scanning CollectionGen.dll for extensions.

Quick hit, you might get this if you try loading the bin directory of the nantcontrib project AND YOU DIDN’T FOLLOW THIS POST.

Solution, FOLLOW THIS POST or you can simply remove the CollectionGen.dll from the bin directory. However if you do that, you aren’t helping my bounce rate and that makes you a Communist… unless you are a Communist then it makes you a Capitalist.